View Featured Offers >>
8973
SimpleChIP® Human Axin2 Intron 1 Primers
ChIP Kits & Reagents
Primer Set

SimpleChIP® Human Axin2 Intron 1 Primers #8973

Citations (0)
Filter:
  1. ChIP
PCR product melting curves were obtained for real-time PCR reactions performed using SimpleChIP® Human Axin2 Intron 1 Primers. Data is shown for both duplicate PCR reactions using 20 ng of total DNA. The melt curve consists of 80 melt cycles, starting at 55°C with increments of 0.5°C per cycle. Each peak is formed from the degradation of a single PCR product.
SimpleChIP® Human Axin2 Intron 1 Primers were tested on DNA isolated from cross-linked cells using the SimpleChIP® Enzymatic Chromatin IP Kit (Magnetic Beads) #9003. Real-time PCR was performed in duplicate on a serial dilution of 2% total input DNA (20 ng, 4 ng, 0.8 ng, and 0.16 ng) using a real-time PCR detection system and SYBR® Green reaction mix. The PCR amplification efficiency (E) and correlation coefficient (R2) were calculated based on the corresponding threshold cycle (CT) of each dilution sample during 40 cycles of real-time PCR (95°C denaturation for 15 sec, 65°C anneal/extension for 60 sec).

Supporting Data

REACTIVITY H

Application Key:

  • WB-Western Blot
  • IP-Immunoprecipitation
  • IHC-Immunohistochemistry
  • ChIP-Chromatin Immunoprecipitation
  • C&R-CUT&RUN
  • C&T-CUT&Tag
  • DB-Dot Blot
  • eCLIP-eCLIP
  • IF-Immunofluorescence
  • F-Flow Cytometry

Species Cross-Reactivity Key:

  • H-Human
  • M-Mouse
  • R-Rat
  • Hm-Hamster
  • Mk-Monkey
  • Vir-Virus
  • Mi-Mink
  • C-Chicken
  • Dm-D. melanogaster
  • X-Xenopus
  • Z-Zebrafish
  • B-Bovine
  • Dg-Dog
  • Pg-Pig
  • Sc-S. cerevisiae
  • Ce-C. elegans
  • Hr-Horse
  • GP-Guinea Pig
  • Rab-Rabbit
  • All-All Species Expected

Product Description

SimpleChIP® Human Axin2 Intron 1 Primers contain a mix of forward and reverse PCR primers that are specific to intron 1 of the human Axin2 gene. These primers can be used to amplify DNA that has been isolated using chromatin immunoprecipitation (ChIP). Primers have been optimized for use in SYBR® Green quantitative real-time PCR and have been tested in conjunction with SimpleChIP® Enzymatic Chromatin IP Kits #9002 and #9003 and ChIP-validated antibodies from Cell Signaling Technology®. Axin2 expression is induced by Wnt signaling and the Axin2 protein is part of the β-Catenin/GSK-3β complex. Axin2 promotes the GSK-3β -mediated phosphorylation and subsequent degradation of β-Catenin, serving to control the duration and/or intensity of Wnt signaling through a negative feedback loop. TCF/LEF transcription factors and β-Catenin are able to bind to the Axin2 gene through multiple TCF/LEF sites located in conserved non-coding sequences.

Product Usage Information

1. Label the appropriate number of PCR tubes or PCR plates compatible with the model of real-time PCR machine to be used. PCR reactions should be performed in duplicate and should include a tube with no DNA to control for contamination, and a serial dilution of a 2% total input chromatin DNA (undiluted, 1:5, 1:25, 1:125), which is used to create a standard curve and determine amplification efficiency.2. Add 2 μl of the appropriate ChIP DNA sample to each tube or well of the PCR plate.

3. Prepare a master PCR reaction mix as described below. Add enough reagents for two extra reactions to account for loss of volume. Add 18 μl of the master PCR reaction mix to each PCR reaction tube or well of the PCR plate.

Reagent Volume for 1 PCR Reaction (20 μl)

Nuclease-free H2O 6 μl

5 μM SimpleChIP® Primers 2 μl

2X SYBR® Green Reaction Mix 10 μl

4. Start the following PCR reaction program:

a. Initial Denaturation: 95°C for 3 min.

b. Denaturation: 95°C for 15 sec.c. Anneal and Extension: Primer-specific temp. for 60 sec.

d. Repeat steps b and c for a total of 40 cycles.

5. Analyze quantitative PCR results using software provided with the real-time PCR machine.

Storage

Supplied in nuclease-free water at a concentration of 5 μM (each primer is at a final concentration of 5 μM). Store at -20°C.

Protocol

PRINT

View >Collapse >

Chromatin IP

Specific for product: SimpleChIP® Plus Enzymatic Chromatin IP Kit (Magnetic Beads) #9005.

Required Reagents

Reagents Included:

  1. Glycine Solution (10X) #7005
  2. Buffer A (4X) #7006
  3. Buffer B (4X) #7007
  4. ChIP Buffer (10X) #7008
  5. ChIP Elution Buffer (2X) #7009
  6. 5 M NaCl #7010
  7. 0.5 M EDTA #7011
  8. ChIP-Grade Protein G Magnetic Beads #9006
  9. DNA Binding Buffer #10007
  10. DNA Wash Buffer (add 4x volume ethanol before use) #10008
  11. DNA Elution Buffer #10009
  12. DNA Purification Columns and Collection Tubes #10010
  13. Protease Inhibitor Cocktail (200X) #7012
  14. RNAse A (10 mg/ml) #7013
  15. Micrococcal Nuclease #10011
  16. Proteinase K (20 mg/ml) #10012
  17. SimpleChIP® Human RPL30 Exon 3 Primers 1 #7014
  18. SimpleChIP® Mouse RPL30 Intron 2 Primers 1 #7015
  19. Histone H3 (D2B12) XP® Rabbit mAb (ChIP Formulated) #4620
  20. Normal Rabbit IgG #2729
  21. DTT (Dithiothreitol) #7016

Reagents Not Included:

  1. Magnetic Separation Rack #7017 / 14654
  2. Phosphate Buffered Saline (PBS-1X) pH7.2 (Sterile) #9872
  3. Nuclease-free Water #12931
  4. Ethanol (96-100%)
  5. Formaldehyde (37% Stock)
  6. SimpleChIP® Universal qPCR Master Mix #88989
! This ! signifies an important step in the protocol regarding volume changes based on the number of immunoprecipitation preparations (IP preps). One IP prep is defined as 4 x 10⁶ tissue cultured cells or 25 mg or disaggregated tissue.
!! This !! signifies an important step to dilute a buffer before proceeding.
SAFE STOP This is a safe stopping point in the protocol, if stopping is necessary.

I. Tissue Cross-linking and Sample Preparation

When harvesting tissue, remove unwanted material such as fat and necrotic material from the sample. Tissue can then be processed and cross-linked immediately, or frozen on dry ice and stored at -80°C for processing later. For optimal chromatin yield and ChIP results, use 25 mg of tissue for each immunoprecipitation to be performed. The chromatin yield does vary between tissue types and some tissues may require more than 25 mg for each immunoprecipitation. Please see Appendix A for more information regarding the expected chromatin yield for different types of tissue. One additional chromatin sample should be processed for Analysis of Chromatin Digestion and Concentration (Section IV). If desired, five additional chromatin samples should be processed for Optimization of Chromatin Digestion (Appendix B).

Before starting:

(!) All buffer volumes should be increased proportionally based on the number of IP preps in the experiment.

  • Remove and warm 200X Protease Inhibitor Cocktail (PIC) and 10X Glycine Solution. Make sure PIC is completely thawed.
  • Prepare 3 ml of Phosphate Buffered Saline (PBS) + 15 µl 200X PIC per 25 mg of tissue to be processed and place on ice.
  • Prepare 45 µl of 37% formaldehyde per 25 mg of tissue to be processed and keep at room temperature. Use fresh formaldehyde that is not past the manufacturer's expiration date.

A. Cross-linking

  1. Weigh the fresh or frozen tissue sample. Use 25 mg of tissue for each IP to be performed (at least 75 mg of tissue is required for one experiment in order to include positive and negative controls).
  2. Place tissue sample in a 60 mm or 100 mm dish and finely mince using a clean scalpel or razor blade. Keep dish on ice. It is important to keep the tissue cold to avoid protein degradation.
  3. Transfer minced tissue to a 15 ml conical tube.
  4. Add 1 ml of PBS + PIC per 25 mg tissue to the conical tube.
  5. To crosslink proteins to DNA, add 45 µl of 37% formaldehyde per 1 ml of PBS + PIC and rock at room temp for 20 min. Final formaldehyde concentration is 1.5%.
  6. Stop cross-linking by adding 100 µl of 10X Glycine per 1 ml of PBS + PIC and mix for 5 min at room temperature.
  7. Centrifuge tissue at 500 x g in a benchtop centrifuge for 5 min at 4°C.
  8. Remove supernatant and wash one time with 1 ml PBS + PIC per 25 mg tissue.
  9. Repeat centrifugation at 500 x g in a benchtop centrifuge for 5 min at 4°C.
  10. Remove supernatant and resuspend tissue in 1 ml PBS + PIC per 25 mg tissue and store on ice. Disaggregate tissue into single-cell suspension using a Medimachine (Part B) or Dounce homogenizer (Part C). (SAFE STOP) Alternatively, samples may be stored at -80°C before disaggregation for up to 3 months.

B. Tissue Disaggregation Using Medimachine from BD Biosciences (part #340587)

  1. Cut off the end of a 1000 µL pipette tip to enlarge the opening for transfer of tissue chunks.
  2. Transfer 1 ml of tissue resuspended in PBS + PIC into the top chamber of a 50 mm medicone (part #340592).
  3. Grind tissue for 2 min according to manufacturer's instructions.
  4. Collect cell suspension from the bottom chamber of the medicone using a 1 ml syringe and 18 gauge blunt needle. Transfer cell suspension to a 15 ml conical tube and place on ice.
  5. Repeat steps 2 to 4 until all the tissue is processed into a homogenous suspension.
  6. If more grinding is necessary, add more PBS + PIC to tissue. Repeat steps 2 to 5 until all tissue is ground into a homogeneous suspension.
  7. Check for single-cell suspension by microscope (optional).
  8. Centrifuge cells at 2,000 x g in a bench top centrifuge for 5 min at 4°C.
  9. Remove supernatant from cells and continue with Nuclei Preparation and Chromatin Digestion (Section III).

C. Tissue Disaggregation Using a Dounce Homogenizer

  1. Transfer tissue resuspended in PBS + PIC to a Dounce homogenizer.
  2. Disaggregate tissue pieces with 20-25 strokes. Check for single-cell suspension by microscope (optional).
  3. Transfer cell suspension to a 15 ml conical tube and centrifuge at 2,000 x g in a benchtop centrifuge for 5 min at 4°C.
  4. Remove supernatant from cells and continue with Nuclei Preparation and Chromatin Digestion (Section III).

II. Cell Culture Cross-linking and Sample Preparation

For optimal ChIP results, use approximately 4 X 10⁶ cells for each immunoprecipitation to be performed (at least 12 X 106 cells are required in order to include positive and negative controls). For HeLa cells, one IP is equivalent to half of a 15 cm culture dish containing cells that are 90% confluent in 20 ml of growth medium. One additional sample should be processed for Analysis of Chromatin Digestion and Concentration (Section IV). Since every cell type is different, we recommend including one extra dish of cells in experiment to be used for determination of cell number using a hemocytometer or cell counter.

Before starting

(!) All buffer volumes should be increased proportionally based on the number of 15 cm tissue culture dishes (or 20 ml suspension cells) used.

  • Remove and warm 200X Protease Inhibitor Cocktail (PIC) #7012 and 10X Glycine Solution #7005. Make sure PIC is completely thawed.
  • Prepare 2 ml of Phosphate Buffered Saline (PBS) + 10 µl 200X PIC per 15 cm dish (or 20 ml suspension cells) to be processed and place on ice.
  • Prepare 40 ml of PBS per 15 cm dish (or 20 ml suspension cells) to be processed and place on ice.
  • Prepare 540 µl of 37% formaldehyde per 15 cm dish (or 20 ml suspension cells) to be processed and keep at room temperature. Use fresh formaldehyde that is not past the manufacturer's expiration date.
  1. To crosslink proteins to DNA, add 540 µl of 37% formaldehyde to each 15 cm culture dish containing 20 ml medium. For suspension cells, add 540 µl of 37% formaldehyde to cells suspended in 20 ml medium (for optimal fixation of suspension cells, cell density should be less than 0.5 x 10⁶ cells/ml at fixation). Swirl briefly to mix and incubate 10 min at room temperature. Final formaldehyde concentration is 1%. Addition of formaldehyde may result in a color change of the medium.
  2. Add 2 ml of 10X glycine to each 15 cm dish containing 20 ml medium, swirl briefly to mix, and incubate 5 min at room temperature. Addition of glycine may result in a color change of the medium.
  3. For suspension cells, transfer cells to a 50 ml conical tube, centrifuge at 500 x g in a benchtop centrifuge 5 min at 4°C and wash pellet two times with 20 ml ice-cold PBS. Remove supernatant and immediately continue with Nuclei Preparation and Chromatin Digestion (Section III).
  4. For adherent cells, remove media and wash cells two times with 20 ml ice-cold 1X PBS, completely removing wash from culture dish each time.
  5. Add 2 ml ice-cold PBS + PIC to each 15 cm dish. Scrape cells into cold buffer. Combine cells from all culture dishes into one 15 ml conical tube.
  6. Centrifuge cells at 2,000 x g in a benchtop centrifuge for 5 min at 4°C. Remove supernatant and immediately continue with Nuclei Preparation and Chromatin Digestion (Section III). (SAFE STOP) Alternatively samples may be stored at -80°C for up to 3 months.

III. Nuclei Preparation and Chromatin Digestion

Before starting

(!) All buffer volumes should be increased proportionally based on the number of IP preps in the experiment.

  • Remove and warm 200X Protease Inhibitor Cocktail (PIC) #7012. Make sure it is completely thawed prior to use.
  • Prepare 1 M DTT (192.8 mg DTT #7016 + 1.12ml dH2O). Make sure DTT crystals are completely in solution.

    (!!) IMPORTANT: Once in solution, store 1M DTT at -20°C.

  • Remove and warm 10X ChIP Buffer #7008 and ensure SDS is completely in solution.
  • Prepare 1 ml 1X Buffer A (250 µl 4X Buffer A #7006 + 750 µl water) + 0.5 µl 1M DTT + 5 µl 200X PIC per IP prep and place on ice.
  • Prepare 1.1 ml 1X Buffer B (275 µl 4X Buffer B #7007 + 825 µl water) + 0.55 µl 1M DTT per IP prep and place on ice.
  • Prepare 100 µl 1X ChIP Buffer (10 µl 10X ChIP Buffer #7008 + 90 µl water) + 0.5 µl 200X PIC per IP prep and place on ice.
  1. Resuspend cells in 1 ml ice-cold 1X Buffer A + DTT + PIC per IP prep. Incubate on ice for 10 min. Mix by inverting tube every 3 min.
  2. Pellet nuclei by centrifugation at 2,000 x g in a benchtop centrifuge for 5 min at 4°C. Remove supernatant and resuspend pellet in 1 ml ice-cold 1X Buffer B + DTT per IP prep. Repeat centrifugation, remove supernatant, and resuspend pellet in 100 µl 1X Buffer B +DTT per IP prep. Transfer sample to a 1.5 ml microcentrifuge tube, up to 1 ml total per tube.
  3. Add 0.5 µl of Micrococcal Nuclease #10011 per IP prep, mix by inverting tube several times and incubate for 20 min at 37°C with frequent mixing to digest DNA to length of approximately 150-900 bp. Mix by inversion every 3 to 5 min. The amount of Micrococcal Nuclease required to digest DNA to the optimal length may need to be determined empirically for individual tissues and cell lines (see Appendix B). HeLa nuclei digested with 0.5 µl Micrococcal Nuclease per 4 x 10⁶ cells and mouse liver tissue digested with 0.5 µl Micrococcal Nuclease per 25 mg of tissue gave the appropriate length DNA fragments.
  4. Stop digest by adding 10 µl of 0.5 M EDTA #7011 per IP prep and placing tube on ice for 1-2 min.
  5. Pellet nuclei by centrifugation at 16,000 x g in a microcentrifuge for 1 min at 4°C and remove supernatant.
  6. Resuspend nuclear pellet in 100 µl of 1X ChIP Buffer + PIC per IP prep and incubate on ice for 10 min.
  7. Sonicate up to 500 µl of lysate per 1.5 ml microcentrifuge tube with several pulses to break nuclear membrane. Incubate samples for 30 sec on wet ice between pulses. Optimal conditions required for complete lysis of nuclei can be determined by observing nuclei under light microscope before and after sonication. HeLa nuclei were completely lysed after 3 sets of 20-sec pulses using a VirTis Virsonic 100 Ultrasonic Homogenizer/Sonicator at setting 6 with a 1/8-inch probe. Alternatively, nuclei can be lysed by homogenizing the lysate 20 times in a Dounce homogenizer; however, lysis may not be as complete.
  8. Clarify lysates by centrifugation at 9,400 x g in a microcentrifuge for 10 min at 4°C.
  9. Transfer supernatant to a new tube. (SAFE STOP) This is the cross-linked chromatin preparation, which should be stored at -80°C until further use. Remove 50 µl of the chromatin preparation for Analysis of Chromatin Digestion and Concentration (Section IV). This 50 µl sample may be stored at -20°C overnight.

IV. Analysis of Chromatin Digestion and Concentration (Recommended Step)

  1. To the 50 µl chromatin sample (from Step 9 in Section III), add 100 µl nuclease-free water, 6 µl 5 M NaCl #7010, and 2 µl RNAse A #7013. Vortex to mix and incubate samples at 37°C for 30 min.
  2. To each RNAse A-digested sample, add 2 µl Proteinase K. Vortex to mix and incubate samples at 65°C for 2 h.
  3. Purify DNA from samples using DNA purification spin columns as described in Section VII. (SAFE STOP) DNA may be stored at -20°C for up to 6 months.
  4. After purification of DNA, remove a 10 µl sample and determine DNA fragment size by electrophoresis on a 1% agarose gel with a 100 bp DNA marker. DNA should be digested to a length of approximately 150-900 bp (1 to 5 nucleosomes).
  5. To determine DNA concentration, transfer 2 µl of purified DNA to 98 µl nuclease-free water to give a 50-fold dilution and read the OD260. The concentration of DNA in µg/ml is OD260 x 2,500. DNA concentration should ideally be between 50 and 200 µg/ml.

NOTE: For optimal ChIP results, it is highly critical that the chromatin is of appropriate size and concentration. Over-digestion of chromatin may diminish signal in the PCR quantification. Under-digestion of chromatin may lead to increased background signal and lower resolution. Adding too little chromatin to the IP may result in diminished signal in the PCR quantification. A protocol for optimization of chromatin digestion can be found in Appendix B.

V. Chromatin Immunoprecipitation

For optimal ChIP results, use approximately 5 to 10 µg of digested, cross-linked chromatin (as determined in Section IV) per immunoprecipitation. This should be roughly equivalent to a single 100 µl IP prep from 25 mg of disaggregated tissue or 4 x 10⁶ tissue culture cells. Typically, 100 µl of digested chromatin is diluted into 400 µl 1X ChIP Buffer prior to the addition of antibodies. However, if more than 100 µl of chromatin is required per IP, the cross-linked chromatin preparation does not need to be diluted as described below. Antibodies can be added directly to the undiluted chromatin preparation for immunoprecipitation of chromatin complexes.

Before starting

(!) All buffer volumes should be increased proportionally based on the number of immunoprecipitations in the experiment.

  • Remove and warm 200X Protease Inhibitor Cocktail (PIC) #7012. Make sure PIC is completely thawed.
  • Remove and warm 10X ChIP Buffer #7008 and ensure SDS is completely in solution.
  • Thaw digested chromatin preparation (from Step 9 in Section III) and place on ice.
  • Prepare low salt wash: 3 ml 1X ChIP Buffer (300 µl 10X ChIP Buffer #7008 + 2.7 ml water) per immunoprecipitation. Store at room temperature until use.
  • Prepare high salt wash: 1 ml 1X ChIP Buffer (100 µl 10X ChIP Buffer #7008 + 900 µl water) + 70 µl 5M NaCl #7010 per immunoprecipitation. Store at room temperature until use.
  1. In one tube, prepare enough 1X ChIP Buffer for the dilution of digested chromatin into the desired number of immunoprecipitations: 400 µl of 1X ChIP Buffer (40 µl of 10X ChIP Buffer + 360 µl water) + 2 µl 200X PIC per immunoprecipitation. When determining the number of immunoprecipitations, remember to include the positive control Histone H3 (D2B12) XP® Rabbit mAb #4620 and negative control Normal Rabbit IgG antibody #2729 samples. Place mix on ice.
  2. To the prepared 1X ChIP Buffer, add the equivalent of 100 µl (5 to 10 µg of chromatin) of the digested, cross-linked chromatin preparation (from Step 9 in Section III) per immunoprecipitation. For example, for 10 immunoprecipitations, prepare a tube containing 4 ml 1X ChIP Buffer (400 µl 10X ChIP Buffer + 3.6 ml water) + 20 µl 200X PIC + 1 ml digested chromatin preparation.
  3. Remove a 10 µl sample of the diluted chromatin and transfer to a microfuge tube. This is your 2% Input Sample, which can be stored at -20°C until further use (Step 1 in Section VI).
  4. For each immunoprecipitation, transfer 500 µl of the diluted chromatin to a 1.5 ml microcentrifuge tube and add the immunoprecipitating antibody. The amount of antibody required per IP varies and should be determined by the user. For the positive control Histone H3 (D2B12) XP® Rabbit mAb #4620, add 10 µl to the IP sample. For the negative control Normal Rabbit IgG #2729, add 1 µl (1 µg) to 2 µl (2 µg) to the IP sample. If using antibodies from Cell Signaling Technology, please see recommended dilution listed on the datasheet or product webpage and calculate the amount (µg) of IgG antibody for negative control based on the Cell Signaling Antibody concentration for a fair comparison. Incubate IP samples 4 h to overnight at 4°C with rotation.

    NOTE: Most antibodies from Cell Signaling Technology work optimally between 1 and 2 ug per IP sample. In the case where there are multiple samples with varying concentrations, it is best to match the negative control Normal Rabbit IgG #2729 to the highest antibody concentration.

  5. Resuspend ChIP-Grade Protein G Magnetic Beads #9006 by gently vortexing. Immediately add 30 µl of Protein G Magnetic Beads to each IP reaction and incubate for 2 h at 4°C with rotation.
  6. Pellet protein G magnetic beads in each immunoprecipitation by placing the tubes in a magnetic separation rack #7017. Wait 1 to 2 min for solution to clear and then carefully remove supernatant.
  7. Wash protein G magnetic beads by adding 1 ml of low salt wash to the beads and incubate at 4°C for 5 min with rotation. Repeat steps 6 and 7 two additional times for a total of 3 low salt washes.
  8. Add 1 ml of high salt wash to the beads and incubate at 4°C for 5 min with rotation.
  9. Pellet protein G magnetic beads in each immunoprecipitation by placing the tubes in a Magnetic Separation Rack. Wait 1 to 2 min for solution to clear and then carefully remove supernatant. Immediately proceed to Section VI.

VI. Elution of Chromatin from Antibody/Protein G Magnetic Beads and Reversal of Cross-links

Before starting

(!) All buffer volumes should be increased proportionally based on the number of immunoprecipitations in the experiment.

  • Remove and warm 2X ChIP Elution Buffer #7009 in a 37°C water bath and ensure SDS is in solution.
  • Set a water bath or thermomixer to 65°C.
  • Prepare 150 µl 1X ChIP Elution Buffer (75 µl 2X ChIP Elution Buffer #7009 + 75 µl water) for each immunoprecipitation and the 2% input sample.
  1. Add 150 µl of the 1X ChIP Elution Buffer to the 2% input sample tube and set aside at room temperature until Step 6.
  2. Add 150 µl 1X ChIP Elution Buffer to each IP sample.
  3. Elute chromatin from the antibody/protein G magnetic beads for 30 min at 65°C with gentle vortexing (1,200 rpm). A thermomixer works best for this step. Alternatively, elutions can be performed at room temperature with rotation, but may not be as complete.
  4. Pellet protein G magnetic beads by placing the tubes in a magnetic separation rack and wait 1 to 2 min for solution to clear.
  5. Carefully transfer eluted chromatin supernatant to a new tube.
  6. To all tubes, including the 2% input sample from Step 1, reverse cross-links by adding 6 µl 5M NaCl and 2 µl Proteinase K #10012, and incubate 2 h at 65°C. This incubation can be extended overnight.
  7. Immediately proceed to Section VII. (SAFE STOP) Alternatively, samples can be stored at -20°C for up to 4 days. However, to avoid formation of a precipitate, be sure to warm samples to room temperature before adding DNA Binding Buffer #10007 (Section VII, Step 1).

VII. DNA Purification Using Spin Columns

Before starting

  • (!!) Add 24 ml of ethanol (96-100%) to DNA Wash Buffer #10008 before use. This step only has to be performed once prior to the first set of DNA purifications.
  • Remove one DNA Purification collection tube #10010 for each DNA sample from Section V.
  1. Add 750 µl DNA Binding Buffer #10007 to each DNA sample and vortex briefly.
    • 5 volumes of DNA Binding Buffer should be used for every 1 volume of sample.
  2. Transfer 450 µl of each sample from Step 1 to a DNA spin column in collection tube.
  3. Centrifuge at 18,500 x g in a microcentrifuge for 30 sec.
  4. Remove the spin column from the collection tube and discard the liquid. Replace spin column in the collection tube.
  5. Transfer the remaining 450 µl of each sample from Step 1 to the spin column in collection tube. Repeat Steps 3 and 4.
  6. Add 750 µl of DNA Wash Buffer #10008 to the spin column in collection tube.
  7. Centrifuge at 18,500 x g in a microcentrifuge for 30 sec.
  8. Remove the spin column from the collection tube and discard the liquid. Replace spin column in the collection tube.
  9. Centrifuge at 18,500 x g in a microcentrifuge for 30 sec.
  10. Discard collection tube and liquid. Retain spin column.
  11. Add 50 µl of DNA Elution Buffer #10009 to each spin column and place into a clean 1.5 ml microcentrifuge tube.
  12. Centrifuge at 18,000 x g in a microcentrifuge for 30 sec to elute DNA.
  13. Remove and discard DNA spin column. Eluate is now purified DNA. (SAFE STOP) Samples can be stored at -20°C.

VIII. Quantification of DNA by PCR

Recommendations

  • Use Filter-tip pipette tips to minimize risk of contamination.
  • The control primers included in the kit are specific for the human or mouse RPL30 gene (#7014 + #7015) and can be used for either standard PCR or quantitative real-time PCR. If the user is performing ChIPs from another species, it is recommended that the user design the appropriate specific primers to DNA and determine the optimal PCR conditions.
  • A Hot-Start Taq polymerase is recommended to minimize the risk of nonspecific PCR products.
  • PCR primer selection is critical. Primers should be designed with close adherence to the following criteria:
Primer length: 24 nucleotides
Optimum Tm: 60°C
Optimum GC: 50%
Amplicon size: 150 to 200 bp (for standard PCR)
80 to 160 bp (for real-time quantitative PCR)

Standard PCR Method

  1. Label the appropriate number of 0.2 ml PCR tubes for the number of samples to be analyzed. These should include the 2% input sample, the positive control histone H3 sample, the negative control normal rabbit IgG sample, and a tube with no DNA to control for DNA contamination.
  2. Add 2 µl of the appropriate DNA sample to each tube.
  3. Prepare a master reaction mix as described below, making sure to add enough reagent for two extra tubes to account for loss of volume. Add 18 µl of master mix to each reaction tube.
Reagent Volume for 1 PCR Reaction (18 µl)
Nuclease-free H2O 12.5 µl
10X PCR Buffer 2.0 µl
4 mM dNTP Mix 1.0 µl
5 µM RPL30 Primers 2.0 µl
Taq DNA Polymerase 0.5 µl
  1. Start the following PCR reaction program:
a. Initial Denaturation 95°C 5 min
b. Denature 95°C 30 sec
c. Anneal 62°C 30 sec
d. Extension 72°C 30 sec
e. Repeat Steps b-d for a total of 34 cycles.
f. Final Extension 72°C 5 min
  1. Remove 10 µl of each PCR product for analysis by 2% agarose gel or 10% polyacrylamide gel electrophoresis with a 100 bp DNA marker. The expected size of the PCR product is 161 bp for human RPL30 #7014 and 159 bp for mouse RPL30 #7015.

Real-Time Quantitative PCR Method

  1. Label the appropriate number of PCR tubes or PCR plates compatible with the model of PCR machine to be used. PCR reactions should include the positive control histone H3 sample, the negative control normal rabbit IgG sample, a tube with no DNA to control for contamination, and a serial dilution of the 2% input chromatin DNA (undiluted, 1:5, 1:25, 1:125) to create a standard curve and determine the efficiency of amplification.
  2. Add 2 µl of the appropriate DNA sample to each tube or well of the PCR plate.
  3. Prepare a master reaction mix as described below. Add enough reagents for two extra reactions to account for loss of volume. Add 18 µl of reaction mix to each PCR reaction tube or well. (SAFE STOP) If necessary cover plate with aluminum foil to avoid light and store at 4°C up to 4 hours or -20°C overnight until machine is ready for use.
Reagent Volume for 1 PCR Reaction (18 µl)
Nuclease-free H2O 6 µl
5 µM RPL30 Primers 2 µl
SimpleChIP® Universal qPCR Master Mix #88989 10 µl
  1. Start the following PCR reaction program:
a. Initial Denaturation 95°C 3 min
b. Denature 95°C 15 sec
c. Anneal and Extension: 60°C 60 sec
d. Repeat steps b and c for a total of 40 cycles.
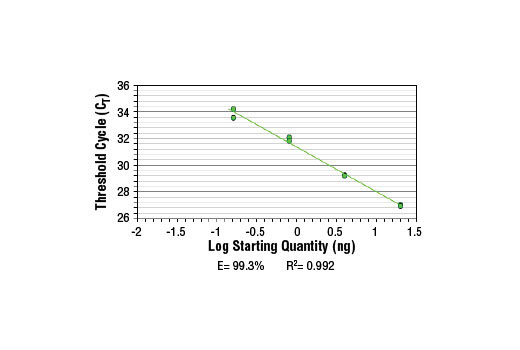
  1. Analyze quantitative PCR results using the software provided with the real-time PCR machine. Alternatively, one can calculate the IP efficiency manually using the Percent Input Method and the equation shown below. With this method, signals obtained from each immunoprecipitation are expressed as a percent of the total input chromatin.

    Percent Input = 2% x 2(C[T] 2%Input Sample - C[T] IP Sample)

    C[T] = CT = Threshold cycle of PCR reaction

IX. NG-Sequencing Library Construction

The immuno-enriched DNA samples prepared with this kit are directly compatible with ChIP-seq. For downstream NG-sequencing DNA library construction, use a DNA library preparation protocol or kit compatible with your downstream sequencing platform. For sequencing on Illumina® platforms, we recommend DNA Library Prep Kit for Illumina® (ChIP-seq, CUT&RUN) #56795 and its associated index primers Multiplex Oligos for Illumina® (Single Index Primers) (ChIP-seq, CUT&RUN) #29580 or Multiplex Oligos for Illumina® (Dual Index Primers) (ChIP-seq, CUT&RUN) #47538.

Recommendations:

  • For transcription factor or co-factor ChIP-seq, use at least 5 ng of ChIP-enriched DNA and amplification of the adaptor-ligated DNA with 10 cycles of PCR.
  • For total histone and histone modifications, or input samples, start with 50 ng of ChIP-enriched DNA and amplification of the adaptor-ligated DNA with 6 cycles of PCR.
  • For library construction of ChIP-enriched DNA for all target types, perform cleanup of adaptor-ligated DNA without size selection.
  • After DNA library construction, check the DNA library for presence of adaptor dimers (~140 bp) using an Agilent High Sensitivity DNA Kit (Agilent Technologies, Cat# G2938-90322), or by agarose gel electrophoresis with 50-100 ng DNA on a 2% agarose TAE gel. If adaptor dimers are present in the DNA library, repeat cleanup of PCR amplified material.
  • The quality of the library can also be confirmed using qPCR and primer sets to known positive and negative target loci. Positive primer pairs should still give the same high signal compared to negative primers as seen in the original qPCR analysis of ChIP-enriched DNA.
  • After final cleanup and quality checks, prepare final purified library samples at 2-10 nM for high throughput sequencing.

APPENDIX A: Expected Chromatin Yield

When harvesting cross-linked chromatin from tissue samples, the yield of chromatin can vary significantly between tissue types. The table to the right provides a range for the expected yield of chromatin from 25 mg of tissue compared to 4 x 10⁶ HeLa cells, and the expected DNA concentration, as determined in Section IV of the protocol. For each tissue type, disaggregation using a Medimachine (BD Biosciences) or a Dounce homogenizer yielded similar amounts of chromatin. However, chromatin processed from tissues disaggregated using the Medimachine typically gave higher IP efficiencies than chromatin processed from tissues disaggregated using a Dounce homogenizer. A Dounce homogenizer is strongly recommended for disaggregation of brain tissue, as the Medimachine does not adequately disaggregate brain tissue into a single-cell suspension. For optimal ChIP results, we recommend using 5 to 10 µg of digested, cross-linked chromatin per immunoprecipitation; therefore, some tissues may require harvesting more than 25 mg per each immunoprecipitation.

Tissue/Cell Total Chromatin Yield Expected DNA Concentration
Spleen 20-30 µg per 25 mg tissue 200-300 µg/ml
Liver 10-15 µg per 25 mg tissue 100-150 µg/ml
Kidney 8-10 µg per 25 mg tissue 80-100 µg/ml
Brain 2-5 µg per 25 mg tissue 20-50 µg/ml
Heart 2-5 µg per 25 mg tissue 20-50 µg/ml
HeLa 10-15 µg per 4 x 10⁶ cells 100-150 µg/ml

APPENDIX B: Optimization of Chromatin Digestion

Optimal conditions for the digestion of cross-linked chromatin DNA to 150-900 base pairs in length is highly dependent on the ratio of Micrococcal Nuclease to the amount of tissue or number of cells used in the digest. Below is a protocol for determination of the optimal digestion conditions for a specific tissue or cell type.

  1. Prepare cross-linked nuclei from 125 mg of tissue or 2 X 10⁷ cells (equivalent of 5 IP preps), as described in Sections I, II, and III. Stop after Step 2 of Section III and proceed as described below.
  2. Transfer 100 µl of the nuclei preparation into 5 individual 1.5 ml microcentrifuge tubes and place on ice.
  3. Add 3 µl Micrococcal Nuclease stock to 27 µl of 1X Buffer B + DTT (1:10 dilution of enzyme).
  4. To each of the 5 tubes in Step 2, add 0 µl, 2.5 µl, 5 µl, 7.5 µl, or 10 µl of the diluted Micrococcal Nuclease, mix by inverting tube several times and incubate for 20 min at 37°C with frequent mixing.
  5. Stop each digest by adding 10 µl of 0.5 M EDTA and placing tubes on ice.
  6. Pellet nuclei by centrifugation at 16,000 x g in a microcentrifuge for 1 min at 4°C and remove supernatant.
  7. Resuspend nuclear pellet in 200 µl of 1X ChIP Buffer + PIC. Incubate on ice for 10 min.
  8. Sonicate lysate with several pulses to break nuclear membrane. Incubate samples 30 sec on wet ice between pulses. Optimal conditions required for complete lysis of nuclei can be determined by observing nuclei under light microscope before and after sonication. HeLa nuclei were completely lysed after 3 sets of 20-sec pulses using a VirTis Virsonic 100 Ultrasonic Homogenizer/Sonicator set at setting 6 with a 1/8-inch probe. Alternatively, nuclei can be lysed by homogenizing the lysate 20 times in a Dounce homogenizer; however, lysis may not be as complete.
  9. Clarify lysates by centrifugation at 9,400 x g in a microcentrifuge for 10 min at 4°C.
  10. Transfer 50 µl of each of the sonicated lysates to new microfuge tubes.
  11. To each 50 µl sample, add 100 µl nuclease-free water, 6 µl 5 M NaCl and 2 µl RNAse A. Vortex to mix and incubate samples at 37°C for 30 min.
  12. To each RNAse A-digested sample, add 2 µl Proteinase K. Vortex to mix and incubate sample at 65°C for 2 h.
  13. Remove 20 µl of each sample and determine DNA fragment size by electrophoresis on a 1% agarose gel with a 100 bp DNA marker.
  14. Observe which of the digestion conditions produces DNA in the desired range of 150-900 base pairs (1 to 5 nucleosomes). The volume of diluted Micrococcal Nuclease that produces the desired size of DNA fragments using this optimization protocol is equivalent to 10 times the volume of Micrococcal Nuclease stock that should be added to one immunoprecipitation preparation (25 mg of disaggregated tissue cells or 4 X 10⁶ tissue culture cells) to produce the desired size of DNA fragments. For example, if 5 µl of diluted Micrococcal Nuclease produces DNA fragments of 150-900 base pairs in this protocol, then 0.5 µl of stock Micrococcal Nuclease should be added to one IP prep during the digestion of chromatin in Section III.
  15. If results indicate that DNA is not in the desired size range, then repeat optimization protocol, adjusting the amount of Micrococcal Nuclease in each digest accordingly. Alternatively, the digestion time can be changed to increase or decrease the extent of DNA fragmentation.

APPENDIX C: Troubleshooting Guide

Problem Possible Causes Recommendation
1. Concentration of the digested chromatin is too low. Not enough cells added to the chromatin digestion or nuclei were not completely lysed after digestion.

If DNA concentration of the chromatin preparation is close to 50 µg/ml, add additional chromatin to each IP to give at least 5 µg/IP and continue with protocol.

Count a separate plate of cells before cross-linking to determine an accurate cell number and/or visualize nuclei under microscope before and after sonication to confirm complete lysis of nuclei.

2. Chromatin is under-digested and fragments are too large (greater than 900 bp).

Cells may have been over cross-linked. Cross-linking for longer than 10 min may inhibit digestion of chromatin.

Too many cells or not enough Micrococcal Nuclease was added to the chromatin digestion.

Perform a time course at a fixed formaldehyde concentration. Shorten the time of cross-linking to 10 min or less.

Count a separate plate of cells before cross-linking to determine accurate cell number and see Appendix B for optimization of chromatin digestion.

3. Chromatin is over-digested and fragments are too small (exclusively 150 bp mono-nucleosome length). Complete digestion of chromatin to mono-nucleosome length DNA may diminish signal during PCR quantification, especially for amplicons greater than 150 bp in length. Not enough cells or too much Micrococcal Nuclease added to the chromatin digestion. Count a separate plate of cells before cross-linking to determine accurate cell number and see Appendix B for optimization of chromatin digestion.
4. No product or very little product in the input PCR reactions.

Not enough DNA added to the PCR reaction or conditions are not optimal.

PCR amplified region may span nucleosome-free region.

Not enough chromatin added to the IP or chromatin is over-digested.

Add more DNA to the PCR reaction or increase the number of amplification cycles.

Optimize the PCR conditions for experimental primer set using purified DNA from cross-linked and digested chromatin. Design a different primer set and decrease length of amplicon to less than 150 bp (see primer design recommendations in Section VIII).

For optimal ChIP results add 5-10 µg chromatin per IP. See recommendations for problems 1 and 3 above.

5. No product in the positive control Histone H3-IP RPL30 PCR reaction.

Not enough chromatin or antibody added to the IP reaction or IP incubation time is too short.

Incomplete elution of chromatin from Protein G beads.

Be sure to add 5-10 µg of chromatin and 10 µl of antibody to each IP reaction and incubate with antibody over-night and an additional 2 h after adding Protein G beads.

Elution of chromatin from Protein G beads is optimal at 65°C with frequent mixing to keep beads suspended in solution.

6. Quantity of product in the negative control Rabbit IgG-IP and positive control Histone H3-IP PCR reactions is equivalent.

Too much or not enough chromatin added to the IP reaction. Alternatively, too much antibody added to the IP reaction.

Too much DNA added to the PCR reaction or too many cycles of amplification.

Add no more than 15 µg of chromatin and 10 µl of histone H3 antibody to each IP reaction. Reduce the amount of normal rabbit IgG to 1 µl per IP.

Add less DNA to the PCR reaction or decrease the number of PCR cycles. It is very important that the PCR products are analyzed within the linear amplification phase of PCR. Otherwise, the differences in quantities of starting DNA can not be accurately measured.

7. No product in the Experimental Antibody-IP PCR reaction.

Not enough DNA added to the PCR reaction.

Not enough antibody added to the IP reaction.

Antibody does not work for IP.

Add more DNA to the PCR reaction or increase the number of amplification cycles.

Typically a range of 1 to 5 µg of antibody are added to the IP reaction; however, the exact amount depends greatly on the individual antibody.

Increase the amount of antibody added to the IP. Find an alternate antibody source.

posted December 2011

revised April 2022

Protocol Id: 82

Specificity / Sensitivity

Species Reactivity:

Human

Background

The chromatin immunoprecipitation (ChIP) assay is a powerful and versatile technique used for probing protein-DNA interactions within the natural chromatin context of the cell (1,2). This assay can be used to either identify multiple proteins associated with a specific region of the genome or to identify the many regions of the genome bound by a particular protein (3-6). ChIP can be used to determine the specific order of recruitment of various proteins to a gene promoter or to "measure" the relative amount of a particular histone modification across an entire gene locus (3,4). In addition to histone proteins, the ChIP assay can be used to analyze binding of transcription factors and co-factors, DNA replication factors, and DNA repair proteins. When performing the ChIP assay, cells are first fixed with formaldehyde, a reversible protein-DNA cross-linking agent that "preserves" the protein-DNA interactions occurring in the cell (1,2). Cells are lysed and chromatin is harvested and fragmented using either sonication or enzymatic digestion. Fragmented chromatin is then immunoprecipitated with antibodies specific to a particular protein or histone modification. Any DNA sequences that are associated with the protein or histone modification of interest will co-precipitate as part of the cross-linked chromatin complex and the relative amount of that DNA sequence will be enriched by the immunoselection process. After immunoprecipitation, the protein-DNA cross-links are reversed and the DNA is purified. Standard PCR or quantitative real-time PCR are often used to measure the amount of enrichment of a particular DNA sequence by a protein-specific immunoprecipitation (1,2). Alternatively, the ChIP assay can be combined with genomic tiling micro-array (ChIP on chip) techniques, high throughput sequencing (ChIP-Seq), or cloning strategies, all of which allow for genome-wide analysis of protein-DNA interactions and histone modifications (5-8). SimpleChIP® primers have been optimized for amplification of ChIP-isolated DNA using real-time quantitative PCR and provide important positive and negative controls that can be used to confirm a successful ChIP experiment.

Pathways

Explore pathways related to this product.

Limited Uses

Except as otherwise expressly agreed in a writing signed by a legally authorized representative of CST, the following terms apply to Products provided by CST, its affiliates or its distributors. Any Customer's terms and conditions that are in addition to, or different from, those contained herein, unless separately accepted in writing by a legally authorized representative of CST, are rejected and are of no force or effect.

Products are labeled with For Research Use Only or a similar labeling statement and have not been approved, cleared, or licensed by the FDA or other regulatory foreign or domestic entity, for any purpose. Customer shall not use any Product for any diagnostic or therapeutic purpose, or otherwise in any manner that conflicts with its labeling statement. Products sold or licensed by CST are provided for Customer as the end-user and solely for research and development uses. Any use of Product for diagnostic, prophylactic or therapeutic purposes, or any purchase of Product for resale (alone or as a component) or other commercial purpose, requires a separate license from CST. Customer shall (a) not sell, license, loan, donate or otherwise transfer or make available any Product to any third party, whether alone or in combination with other materials, or use the Products to manufacture any commercial products, (b) not copy, modify, reverse engineer, decompile, disassemble or otherwise attempt to discover the underlying structure or technology of the Products, or use the Products for the purpose of developing any products or services that would compete with CST products or services, (c) not alter or remove from the Products any trademarks, trade names, logos, patent or copyright notices or markings, (d) use the Products solely in accordance with CST Product Terms of Sale and any applicable documentation, and (e) comply with any license, terms of service or similar agreement with respect to any third party products or services used by Customer in connection with the Products.

For Research Use Only. Not for Use in Diagnostic Procedures.
Cell Signaling Technology is a trademark of Cell Signaling Technology, Inc.
SimpleChIP is a registered trademark of Cell Signaling Technology, Inc.
All other trademarks are the property of their respective owners. Visit our Trademark Information page.
Inquiry Info.# 8973