| Cat. # | Size | Qty. | Price |
|---|---|---|---|
| 2258T | 20 µl |
|
|
| 2258S | 100 µl |
|
| REACTIVITY | H M |
| SENSITIVITY | Endogenous |
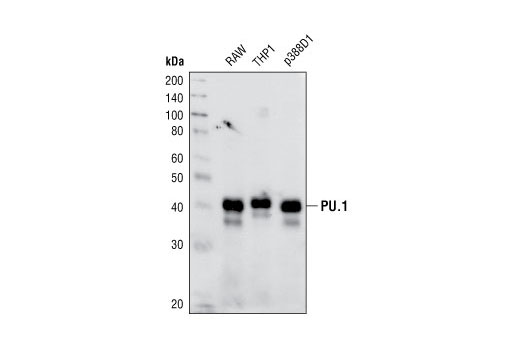
| MW (kDa) | 42 |
| Source/Isotype | Rabbit IgG |
Product Information
| Application | Dilution |
|---|---|
| Western Blotting | 1:1000 |
| Simple Western™ | 1:10 - 1:50 |
| Immunoprecipitation | 1:100 |
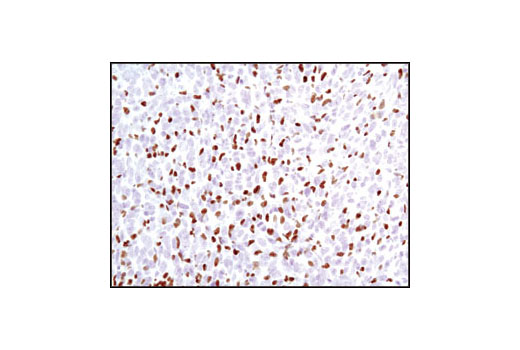
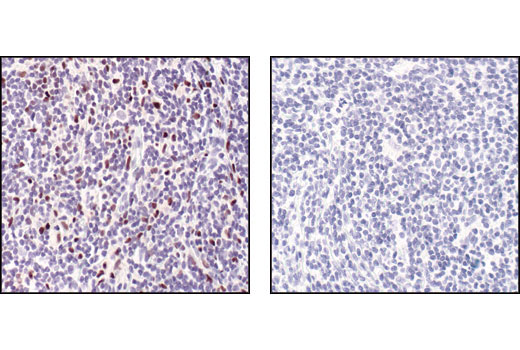
| Immunohistochemistry (Paraffin) | 1:100 |
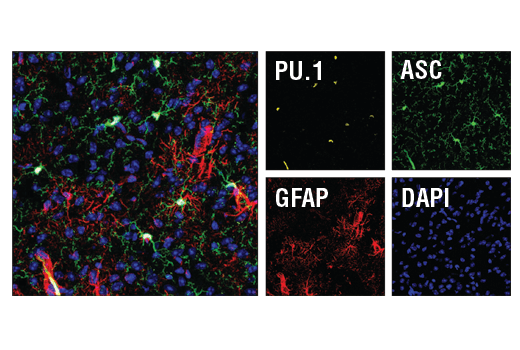
| Immunofluorescence (Frozen) | 1:200 - 1:400 |
| Immunofluorescence (Immunocytochemistry) | 1:200 - 1:400 |
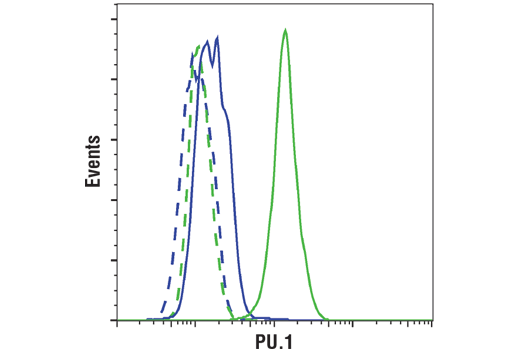
| Flow Cytometry (Fixed/Permeabilized) | 1:200 |
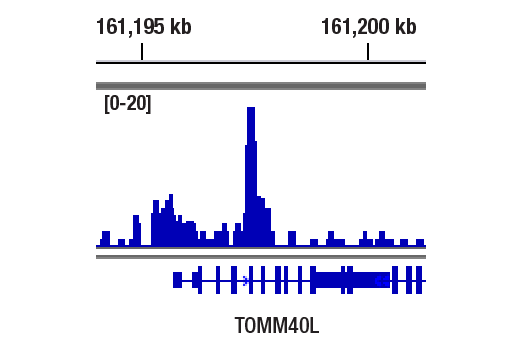
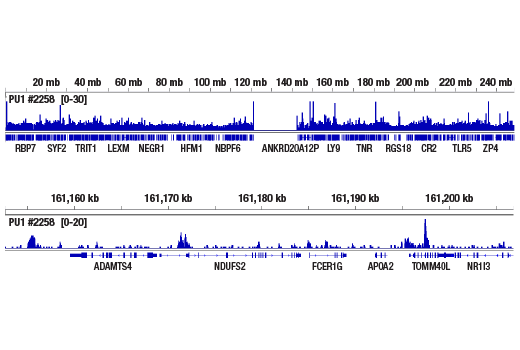
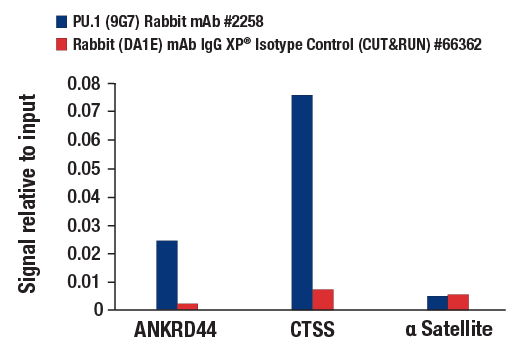
| CUT&RUN | 1:50 |
For western blots, incubate membrane with diluted primary antibody in 5% w/v BSA, 1X TBS, 0.1% Tween® 20 at 4°C with gentle shaking, overnight.
NOTE: Please refer to primary antibody product webpage for recommended antibody dilution.
From sample preparation to detection, the reagents you need for your Western Blot are now in one convenient kit: #12957 Western Blotting Application Solutions Kit
NOTE: Prepare solutions with reverse osmosis deionized (RODI) or equivalent grade water.
Load 20 µl onto SDS-PAGE gel (10 cm x 10 cm).
NOTE: Loading of prestained molecular weight markers (#59329, 10 µl/lane) to verify electrotransfer and biotinylated protein ladder (#7727, 10 µl/lane) to determine molecular weights are recommended.
NOTE: Volumes are for 10 cm x 10 cm (100 cm2) of membrane; for different sized membranes, adjust volumes accordingly.
* Avoid repeated exposure to skin.
posted June 2005
revised June 2020
Protocol Id: 10
This protocol is intended for immunoprecipitation of native proteins utilizing Protein A agarose beads for analysis by western immunoblot or kinase activity.
NOTE: Prepare solutions with reverse osmosis deionized (RODI) or equivalent grade water.
10X Cell Lysis Buffer: (#9803) To prepare 10 ml of 1X cell lysis buffer, add 1 ml cell lysis buffer to 9 ml dH2O, mix.
NOTE: Add 1 mM PMSF (#8553) immediately prior to use.
IMPORTANT: Appropriate isotype controls are highly recommended in order to show specific binding in your primary antibody immunoprecipitation. Use Normal Rabbit IgG #2729 for rabbit polyclonal primary antibodies, Rabbit (DA1E) mAb IgG XP® Isotype Control #3900 for rabbit monoclonal primary antibodies, Mouse (G3A1) mAb IgG1 Isotype Control #5415 for mouse monoclonal IgG1 primary antibodies, Mouse (E5Y6Q) mAb IgG2a Isotype Control #61656 for mouse monoclonal IgG2a primary antibodies, Mouse (E7Q5L) mAb IgG2b Isotype Control #53484 for mouse monoclonal IgG2b primary antibodies, and Mouse (E1D5H) mAb IgG3 Isotype Control #37988 for mouse monoclonal IgG3 primary antibodies. Isotype controls should be concentration matched and run alongside the primary antibody samples.
Proceed to one of the following specific set of steps.
NOTE: When using primary antibodies produced in rabbit to detect proteins with a molecular weight in the range of 50 kDa, we recommend using Mouse Anti-Rabbit IgG (Light-Chain Specific) (D4W3E) mAb (#45262) or Mouse Anti-Rabbit IgG (Conformation Specific) (L27A9) mAb (#3678) (or HRP conjugate #5127) as a secondary antibody to minimize interference produced by denatured rabbit heavy chain. For proteins with a molecular weight in the range of 25 kDa, Mouse Anti-Rabbit IgG (Conformation Specific) (L27A9) mAb (#3678) (or HRP conjugate #5127) is recommended to minimize interference produced by denatured mouse light chain.
When using primary antibodies produced in mouse to detect proteins with a molecular weight in the range of 50 kDa, we recommend using Rabbit Anti-Mouse IgG (Light Chain Specific) (D3V2A) mAb (HRP Conjugate) (#58802) as a secondary antibody to minimize interference produced by denatured mouse heavy chain.
posted December 2008
revised October 2021
Protocol Id: 409
NOTE: Prepare solutions with reverse osmosis deionized (RODI) or equivalent grade water.
NOTE: Do not allow slides to dry at any time during this procedure.
For Citrate: Heat slides in a microwave submersed in 1X citrate unmasking solution until boiling is initiated; follow with 10 min at a sub-boiling temperature (95°-98°C). Cool slides on bench top for 30 min.
|
RECOMMENDED DETECTION REAGENTS |
SignalStain® Boost IHC Detection Reagent (HRP, Rabbit) #8114 | SignalStain® Boost IHC Detection Reagent (AP, Rabbit) #18653 |
|---|---|---|
|
COMPATIBLE CHROMOGEN |
SignalStain® DAB Substrate Kit #8059 | SignalStain® Vibrant Red Alkaline Phosphatase Substrate Kit #76713 |
| SignalStain® Vivid Purple Peroxidase Substrate Kit #96632 | SignalStain® Ultra Blue Alkaline Phosphatase Substrate Kit #12824 | |
| SignalStain® Deep Black Peroxidase Substrate Kit #72986 | ||
| SignalStain® Radiant Yellow Peroxidase Substrate Kit #69644 |
NOTE: Use of detection reagents other than those specified in this protocol may require further optimization of the primary antibody to account for the different sensitivities of the detection reagents.
posted February 2010
revised June 2020
Protocol Id: 283
NOTE: Prepare solutions with reverse osmosis deionized (RODI) or equivalent grade water.
Recommended Fluorochrome-conjugated Anti-Rabbit secondary antibodies:
NOTE: When using any primary or fluorochrome-conjugated secondary antibody for the first time, titrate the antibody to determine which dilution allows for the strongest specific signal with the least background for your sample.
Cover sections with 4% formaldehyde dilute in 1X PBS.
NOTE: Formaldehyde is toxic, use only in fume hood.
NOTE: All subsequent incubations should be carried out at room temperature unless otherwise noted in a humid light-tight box or covered dish/plate to prevent drying and fluorochrome fading.
posted November 2006
revised July 2016
Protocol Id: 151
Achieve higher quality immunofluorescent images using the efficient and cost-effective, pre-made reagents in our #12727 Immunofluorescence Application Solutions Kit
NOTE: Prepare solutions with reverse osmosis deionized (RODI) or equivalent grade water.
Recommended Fluorochrome-conjugated Anti-Rabbit secondary antibodies:
NOTE: Cells should be grown, treated, fixed and stained directly in multi-well plates, chamber slides or on coverslips.
Aspirate liquid, then cover cells to a depth of 2–3 mm with 4% formaldehyde diluted in 1X PBS.
NOTE: Formaldehyde is toxic, use only in a fume hood.
NOTE: All subsequent incubations should be carried out at room temperature unless otherwise noted in a humid light-tight box or covered dish/plate to prevent drying and fluorochrome fading.
posted November 2006
revised November 2013
Protocol Id: 24
All reagents required for this protocol may be efficiently purchased together in our Intracellular Flow Cytometry Kit (Methanol) #13593, or individually using the catalog numbers listed below.
NOTE: Prepare solutions with reverse osmosis deionized (RODI) or equivalent grade water.
NOTE: When including fluorescent cellular dyes in your experiment (including viability dyes, DNA dyes, etc.), please refer to the dye product page for the recommended protocol. Visit www.cellsignal.com for a full listing of cellular dyes validated for use in flow cytometry.
NOTE: Adherent cells or tissue should be dissociated and in single-cell suspension prior to fixation.
NOTE: Optimal centrifugation conditions will vary depending upon cell type and reagent volume. Generally, 150-300g for 1-5 minutes will be sufficient to pellet the cells.
NOTE: If using whole blood, lyse red blood cells and wash by centrifugation prior to fixation.
NOTE: Antibodies targeting CD markers or other extracellular proteins may be added prior to fixation if the epitope is disrupted by formaldehyde and/or methanol. The antibodies will remain bound to the target of interest during the fixation and permeabilization process. However, note that some fluorophores (including PE and APC) are damaged by methanol and thus should not be added prior to permeabilization. Conduct a small-scale experiment if you are unsure.
NOTE: Count cells using a hemocytometer or alternative method.
posted July 2009
revised June 2020
Protocol Id: 404
| ! | This ! signifies an important step in the protocol regarding volume changes based on the number of CUT&RUN reactions being performed. |
| !! | This !! signifies an important step to dilute a buffer before proceeding. |
| SAFE STOP | This is a safe stopping point in the protocol, if stopping is necessary. |
For most cell types, live cells can be used in the CUT&RUN assay to generate robust enrichment of histones, transcription factors, and cofactors. For certain cell types that are fragile or sensitive to Concanavalin A, a light cell fixation helps to preserve the cells and keep them intact. In addition, fixation may help to boost enrichment of low abundance and/or weak binding transcription factors and cofactors if robust signal is not observed using fresh cells. Please note that over-fixation of cells will inhibit the CUT&RUN assay.
Our CUT&RUN assay works with a wide range of cell or tissue inputs. As defined in the protocol, one CUT&RUN reaction can contain between 5,000 to 250,000 cells or 1 to 5 mg of tissue. Buffer volumes used throughout the protocol do not need to be adjusted based on the amount of cells or tissue per reaction, as long as it is within this range. When indicated, buffer volumes do need to be increased proportionally based on the number of reactions being performed. If possible, we recommend using 100,000 cells or 1 mg of tissue per reaction. If cells are limiting, we recommend using at least 5,000 to 10,000 cells per reaction for histone modifications and 10,000 to 20,000 cells per reaction for transcription factors or cofactors.
NOTE: The amount of digitonin recommended for cell permeabilization is in excess and should be sufficient for permeabilization of most cell lines and tissue types. However, not all cell lines and tissues exhibit the same sensitivity to digitonin. If your specific cell line or tissue does not work with the recommended digitonin concentration, you can optimize conditions by following the protocol provided in Appendix A. Digitonin treatment should result in permeabilization of >90% of the cell population.
! All buffer volumes should be increased proportionally based on the number of CUT&RUN reactions being performed.
NOTE: Steps for live cell (no fixation) preparation should be performed in succession at room temperature to minimize stress on the cells. To minimize DNA fragmentation, avoid vigorous vortexing and cavitation of samples during resuspension. When preparing live cells for CUT&RUN, we recommend preparing the Concanavalin A Beads (Section II, Steps 1 to 5) prior to preparing the cells as to minimize the amount of time the cells sit around during bead preparation. Activated beads can be stored on ice until ready to use.
NOTE: For adherent cells, the cells first need to be detached from the dish using Trypsin and neutralized with at least 3 volumes of tissue culture medium. We do not recommend scraping the cells from the dish because this can stress and even lyse the cells. Cells should be counted using a hemocytometer or other cell counter to ensure the proper number of cells are being used for the experiment.
NOTE: The challenge of working with low cell numbers (<100,000 total cells) is that the centrifuged cell pellet is not always visible by eye, making it easy to lose cells during the wash steps. Therefore, when working with low cell numbers, we recommend skipping the wash steps 3 to 5 below. The binding of the Concanavalin A beads to cells is tolerant to having 40% cell medium in the binding reaction. Therefore, after the initial centrifugation of the cell suspension in Step 2, one can remove most of the supernatant, leaving behind ≤40 µl cell medium per reaction. Then in Step 6 add enough 1X Wash Buffer (+ spermidine + PIC) to the cell suspension to achieve a total volume of 100 µl per reaction.
NOTE: The input sample will be incubated at 55°C later in the protocol, so it is recommended to use a safe-lock 1.5 ml tube to reduce evaporation during the incubation.
NOTE: The following reagents are required for fixed cell preparation and are not included in this kit: 37% formaldehyde or 16% Formaldehyde Methanol-Free #12606, Glycine Solution (10X) #7005, and 10% SDS Solution #20533.
! All buffer volumes should be increased proportionally based on the number of CUT&RUN reactions being performed.
NOTE: With adherent cell lines, cells first need to be detached from the dish using Trypsin and neutralized with at least 3 volumes of medium. We don’t recommend scraping the cells from the dish because this can stress and even lyse the cells. Cells should be counted using a hemocytometer or other cell counter to ensure the proper number of cells are being used for the experiment.
NOTE: The challenge of working with low cell numbers (<100,000 total cells) is that the centrifuged cell pellet is not always visible by eye, making it easy to lose cells during the wash steps. In this case we do NOT recommend freezing down cell pellets. In addition, when working with these low cell numbers, we recommend skipping the wash steps 5 to 7 below. The binding of the Concanavalin A beads to cells is tolerant to having 40% cell medium in the binding reaction. Therefore, after the initial centrifugation of the cell suspension in Step 4, one can remove most of the supernatant, leaving behind ≤40 µl cell medium per reaction. Then in Step 8 add enough 1X Wash Buffer (+ spermidine + PIC) to the cell suspension to achieve a total volume of 100 µl per reaction.
NOTE: The input sample will be incubated at 55°C later in the protocol, so it is recommended to use a safe-lock 1.5 ml tube to reduce evaporation during the incubation.
For most tissue types, 1 mg of lightly fixed tissue (0.1% formaldehyde for 2 min) can generate robust enrichment of histones, transcription factors and cofactors. Formaldehyde fixation is not required for enrichment of histone modifications. However, many transcription factors and cofactors do require light fixation of the tissue for optimal results. Some low abundance and/or weak binding transcription factors and cofactors may require a medium fixation (0.1% formaldehyde for 10 min) for optimal results. In addition, medium fixation may improve results when using difficult tissue types, like fibrous tissues. Please note that over-fixation will inhibit the CUT&RUN assay. Fixed tissue samples can be frozen at -80°C for up to 6 months before using.
NOTE: When preparing fresh tissue (no fixation) for CUT&RUN, we recommend preparing the Concanavalin A Beads (Section II, Steps 1 to 5) prior to preparing the tissue as to minimize the amount of time the cells sit around during bead preparation. Activated beads can be stored on ice until ready to use.
NOTE: The following reagents are required for fixed tissue preparation and are not included in this kit: 37% formaldehyde or 16% Formaldehyde Methanol-Free #12606, Phosphate Buffered Saline (PBS) #9872, Glycine Solution (10X) #7005, and 10% SDS Solution #20533.
! All buffer volumes should be increased proportionally based on the number of CUT&RUN reactions being performed.
NOTE: For some transcription factors or cofactors, or for difficult tissue types like fibrous tissues, up to 5 mg tissue per reaction can be used without scaling up reagents.
NOTE: We recommend light fixation of tissues because this condition works optimally for most tissue types and protein targets. However, if fresh tissues are desired, skip Steps 3 to 8 and immediately proceed to Step 9.
NOTE: This volume of fixation solution is sufficient for up to 50 mg of tissue. If processing >50 mg, scale up fixation solution and 1X PBS + PIC solution in Step 7 accordingly.
NOTE: For difficult tissue types (like fibrous tissues) or low abundance and/or weak binding transcription factors or cofactors, extending the formaldehyde fixation to 10 min may improve results.
NOTE: The input sample will be incubated at 55°C later in the protocol, so it is recommended to use a safe-lock 1.5 ml tube to reduce evaporation during the incubation.
! All buffer volumes should be increased proportionally based on the number of CUT&RUN reactions being performed.
NOTE: Digitonin Solution #16359 should be stored at -20°C. Please keep on ice during use and store at -20°C when finished for the day.
NOTE: Avoid vortexing the Concanavalin A Magnetic Bead suspension as repeated vortexing may displace the Concanavalin A from the beads.
NOTE: To avoid loss of beads, remove liquid using a pipet. Do not aspirate using a vacuum.
NOTE: If Concanavalin A Beads are prepared prior to cell or tissue preparation, as recommended for live cells and fresh tissue, the activated beads can be stored on ice until use.
NOTE: Concanavalin A Magnetic Beads may clump or stick to the sides of the tube. Beads can be resuspended by pipetting up and down. Rocking or shaking of sample tubes is not necessary.
NOTE: The amount of antibody required for CUT&RUN varies and should be determined by the user. For the positive control Tri-Methyl-Histone H3 (Lys4) (C42D8) Rabbit mAb #9751, add 2 µl of antibody to the sample. For the negative control Rabbit (DA1E) mAb IgG XP® Isotype Control (CUT&RUN) #66362, add 5 µl to the sample. We strongly recommend using the negative control antibody and NOT a no-antibody control, because the latter results in high levels of non-specific MNase digestion and high background signal. We recommend using the input sample for comparison with both qPCR and NG-seq analysis, when possible.
NOTE: Concanavalin A Magnetic Beads may clump or stick to the sides of the tube. Beads can be resuspended by pipetting up and down. Rocking or shaking of sample tubes is not necessary.
! All buffer volumes should be increased proportionally based on the number of CUT&RUN reactions being performed.
NOTE: Digitonin Solution #16359 should be stored at -20°C. Please keep on ice during use and store at -20°C when finished for the day.
NOTE: The Digitonin Buffer prepared here will be used for both Section III and IV.
NOTE: Concanavalin A Magnetic Beads may clump or stick to the sides of the tube. Beads can be resuspended by pipetting up and down. Rocking or shaking of sample tubes is not necessary.
! All buffer volumes should be increased proportionally based on the number of CUT&RUN reactions being performed.
NOTE: Digitonin Solution #16359 should be stored at -20°C. Please keep on ice during use and store at -20°C when finished for the day.
Optional: Sample Normalization Spike-In DNA can be added into the 1X Stop Buffer if sample normalization is desired (for example, see Figure 8 in Section VII). For qPCR analysis, we recommend adding 5 µl (5 ng) of Spike-In DNA to each reaction. For NG-seq analysis, we recommend diluting the Sample Normalization Spike-In DNA 100-fold into Nuclease-free Water #12931 and then adding 5 µl (50 pg) of Spike-In DNA to each reaction. When using 100,000 cells or 1 mg of tissue per reaction this ensures that the normalization reads are around 0.5% of the total sequencing reads. If more or less than 100,000 cells or 1 mg of tissue are used per reaction, proportionally scale the volume of Sample Normalization Spike-In DNA up or down to adjust normalization reads to around 0.5% of total reads.
NOTE: Digestion should be performed in a 4°C cooling block or refrigerator. The temperature of ice can get as low as 0°C, which can limit digestion and decrease signal. Rocking or shaking of sample tubes is not necessary.
NOTE: If live cells or fresh tissues (not fixed) are used for the CUT&RUN assay, skip Steps 14-15 and immediately proceed to Step 16.
NOTE: Fixed samples will be incubated at 65°C later in the protocol, so it is recommended to use a safe-lock 2 ml tube to reduce evaporation during the incubation.
NOTE: SDS may precipitate out of solution if samples are not pre-warmed to room temperature.
Fragmentation of input DNA is required for compatibility with downstream NG-Sequencing but is not necessary for downstream qPCR analysis. If a sonicator is not available, we recommend using the unfragmented input DNA for qPCR analysis; however, the input DNA should be purified using phenol/chloroform extraction and ethanol precipitation because the size of unfragmented input DNA is too large to be purified using DNA spin columns. If a sonicator is not available and downstream NG-Sequencing analysis is desired, one can use the CUT&RUN normal IgG antibody sample as the negative control, although this is not ideal because the normal IgG-enriched sample may show non-specific DNA enrichment. Alternatively, an input DNA fragmentation protocol using MNase is available at https://cst-science.com/CUT-RUN-input-digestion.
! All buffer volumes should be increased proportionally based on the number of input samples being prepared.
NOTE: Sonication conditions may need to be determined empirically by testing different sonicator power settings and/or durations of sonication, following the protocol in Appendix B. Optimal sonication conditions will generate chromatin fragments ranging in size from 100-600 bp. Sonication for 5 sets of 15-sec pulses using a VirTis Virsonic 100 Ultrasonic Homogenizer/Sonicator at setting 6 with a 1/8-inch probe sufficiently fragments the input chromatin.
DNA can be purified from input and enriched chromatin samples using DNA spin columns, as described in Section VI - A, or phenol/chloroform extraction followed by ethanol precipitation as described in Section VI - B. Purification using DNA spin columns is simple and fast, providing good recovery of DNA fragments above 35 bp (Figure 7A, Lane 2). Phenol/chloroform extraction followed by ethanol precipitation is more difficult, but provides better recovery of DNA fragments below 35 bp (Figure 7A, Lane 3); however, as shown in Figure 7B, the majority of DNA fragments generated in the CUT&RUN assay are larger than 35 bp. Therefore, DNA spin columns provide a quick and simple method for purification of > 98% of the total CUT&RUN DNA fragments.
Purified DNA can be quantified prior to NG-seq analysis using a picogreen-based DNA quantification assay. For CUT&RUN reactions containing 100,000 cells, the expected DNA yield for a CUT&RUN reaction ranges from 0.5 to 10 ng per reaction for transcription factors and cofactors, and 1 to 20 ng per reaction for histone modifications.
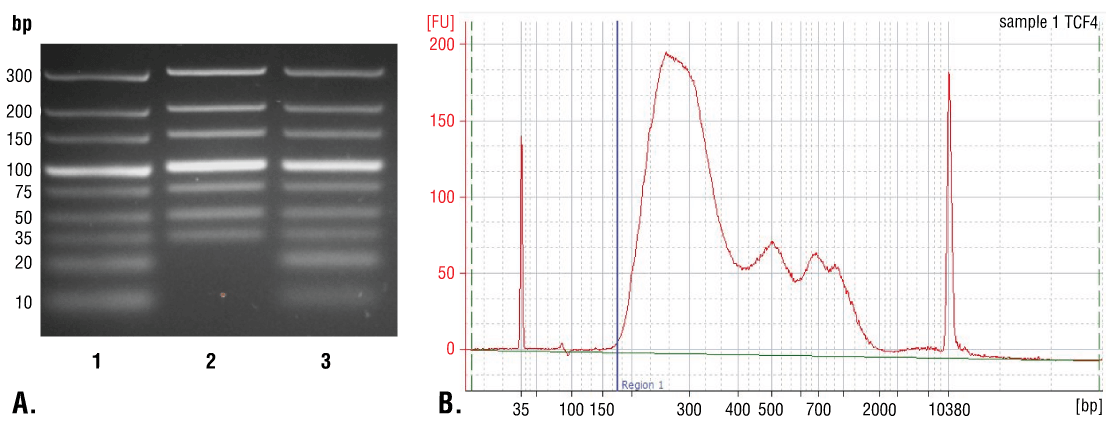
FIGURE 7. Comparison of DNA purification using spin columns or phenol/chloroform extraction followed by ethanol precipitation. (A) A low range DNA ladder mix (lane 1, unpurified) was purified using either DNA Purification Buffers and Spin Columns (ChIP, CUT&RUN, CUT&Tag) #14209 (lane 2) or phenol/chloroform extraction followed by ethanol precipitation (lane 3) and separated by electrophoresis on a 4% agarose gel. As shown, phenol/chloroform followed by ethanol precipitation efficiently recovers all DNA fragment sizes, while DNA spin columns recover DNA fragments ≥ 35 bp. (B) DNA was purified using phenol/chloroform extraction followed by ethanol precipitation from a CUT&RUN assay performed using TCF4/TCF7L2 (C48H11) Rabbit mAb #2569. The size of the DNA fragments in the library was analyzed using a Bioanalyzer (Agilent Technologies). The adaptor and barcode sequences added to the library during construction account for 140 bp in fragment length. Therefore, starting 35 bp DNA fragments would be 175 bp in length after library preparation (indicated with blue vertical line in figure). As shown, less than 2% of the total CUT&RUN enriched DNA fragments are less than 175 bp (starting length of 35 bp), suggesting that DNA purification spin columns are sufficient for capture of > 98% of the total CUT&RUN DNA fragments.
NOTE: DNA can be purified from input and enriched chromatin samples using the DNA Purification Buffers and Spin Columns (ChIP, CUT&RUN, CUT&Tag) #14209 (not included in this kit) and the modified protocol below. Steps 1 through 5 are modified to reflect the requirement for adding 5 volumes (1.5 ml) of DNA Binding Buffer to the 300 µl of input and enriched chromatin samples.
NOTE: 5 volumes of DNA Binding Buffer should be used for every 1 volume of sample.
NOTE: The following reagents are required for the phenol/chloroform extraction and ethanol precipitation and are not included in this kit: phenol/chloroform/isoamyl alcohol (25:24:1), chloroform/isoamyl alcohol (24:1), 3M Sodium Acetate (pH 5.2), 20mg/ml glycogen, 100% ethanol, 70% ethanol, and 1X TE buffer or Nuclease-free Water #12931.
NOTE: If sample normalization is performed, only the CUT&RUN samples are to be analyzed using the Sample Normalization Primer Set. The input DNA does not contain the Normalization Spike-In DNA.
| Reagent | Volume for 1 PCR Reaction (18 µl) |
|---|---|
| Nuclease-free H2O #12931 | 6 µl |
| 5 µM Primers | 2 µl |
| SimpleChIP® Universal qPCR Master Mix #88989 | 10 µl |
| a. | Initial Denaturation | 95°C for 3 min |
| b. | Denature | 95°C for 15 sec |
| c. | Anneal and Extension | 60°C for 60 sec |
| d. | Repeat steps b and c for a total of 40 cycles. |
| C[T] value of Sample Normalization Primer Set | **Normalization Factor for qPCR | Signal Before Normalization (% Input Calc'd from Step 5) | Signal After Normalization | |
| Sample 1 | 23.31 | 2(23.31-23.31)=1.00 | 24.4% | 24.4%/1.00=24.4% |
| Sample 2 | 24.24 | 2(23.31-24.24)=0.52 | 12.0% | 12.0%/0.52=23.1% |
| Sample 3 | 25.08 | 2(23.31-25.08)=0.29 | 6.28% | 6.28%/0.29=21.7% |
| Sample 4 | 26.30 | 2(23.31-26.30)=0.13 | 2.72% | 2.72%/0.13=20.9% |
**Normalization Factor for qPCR = 2(C[T] Selected Sample - C[T] the Other Sample)
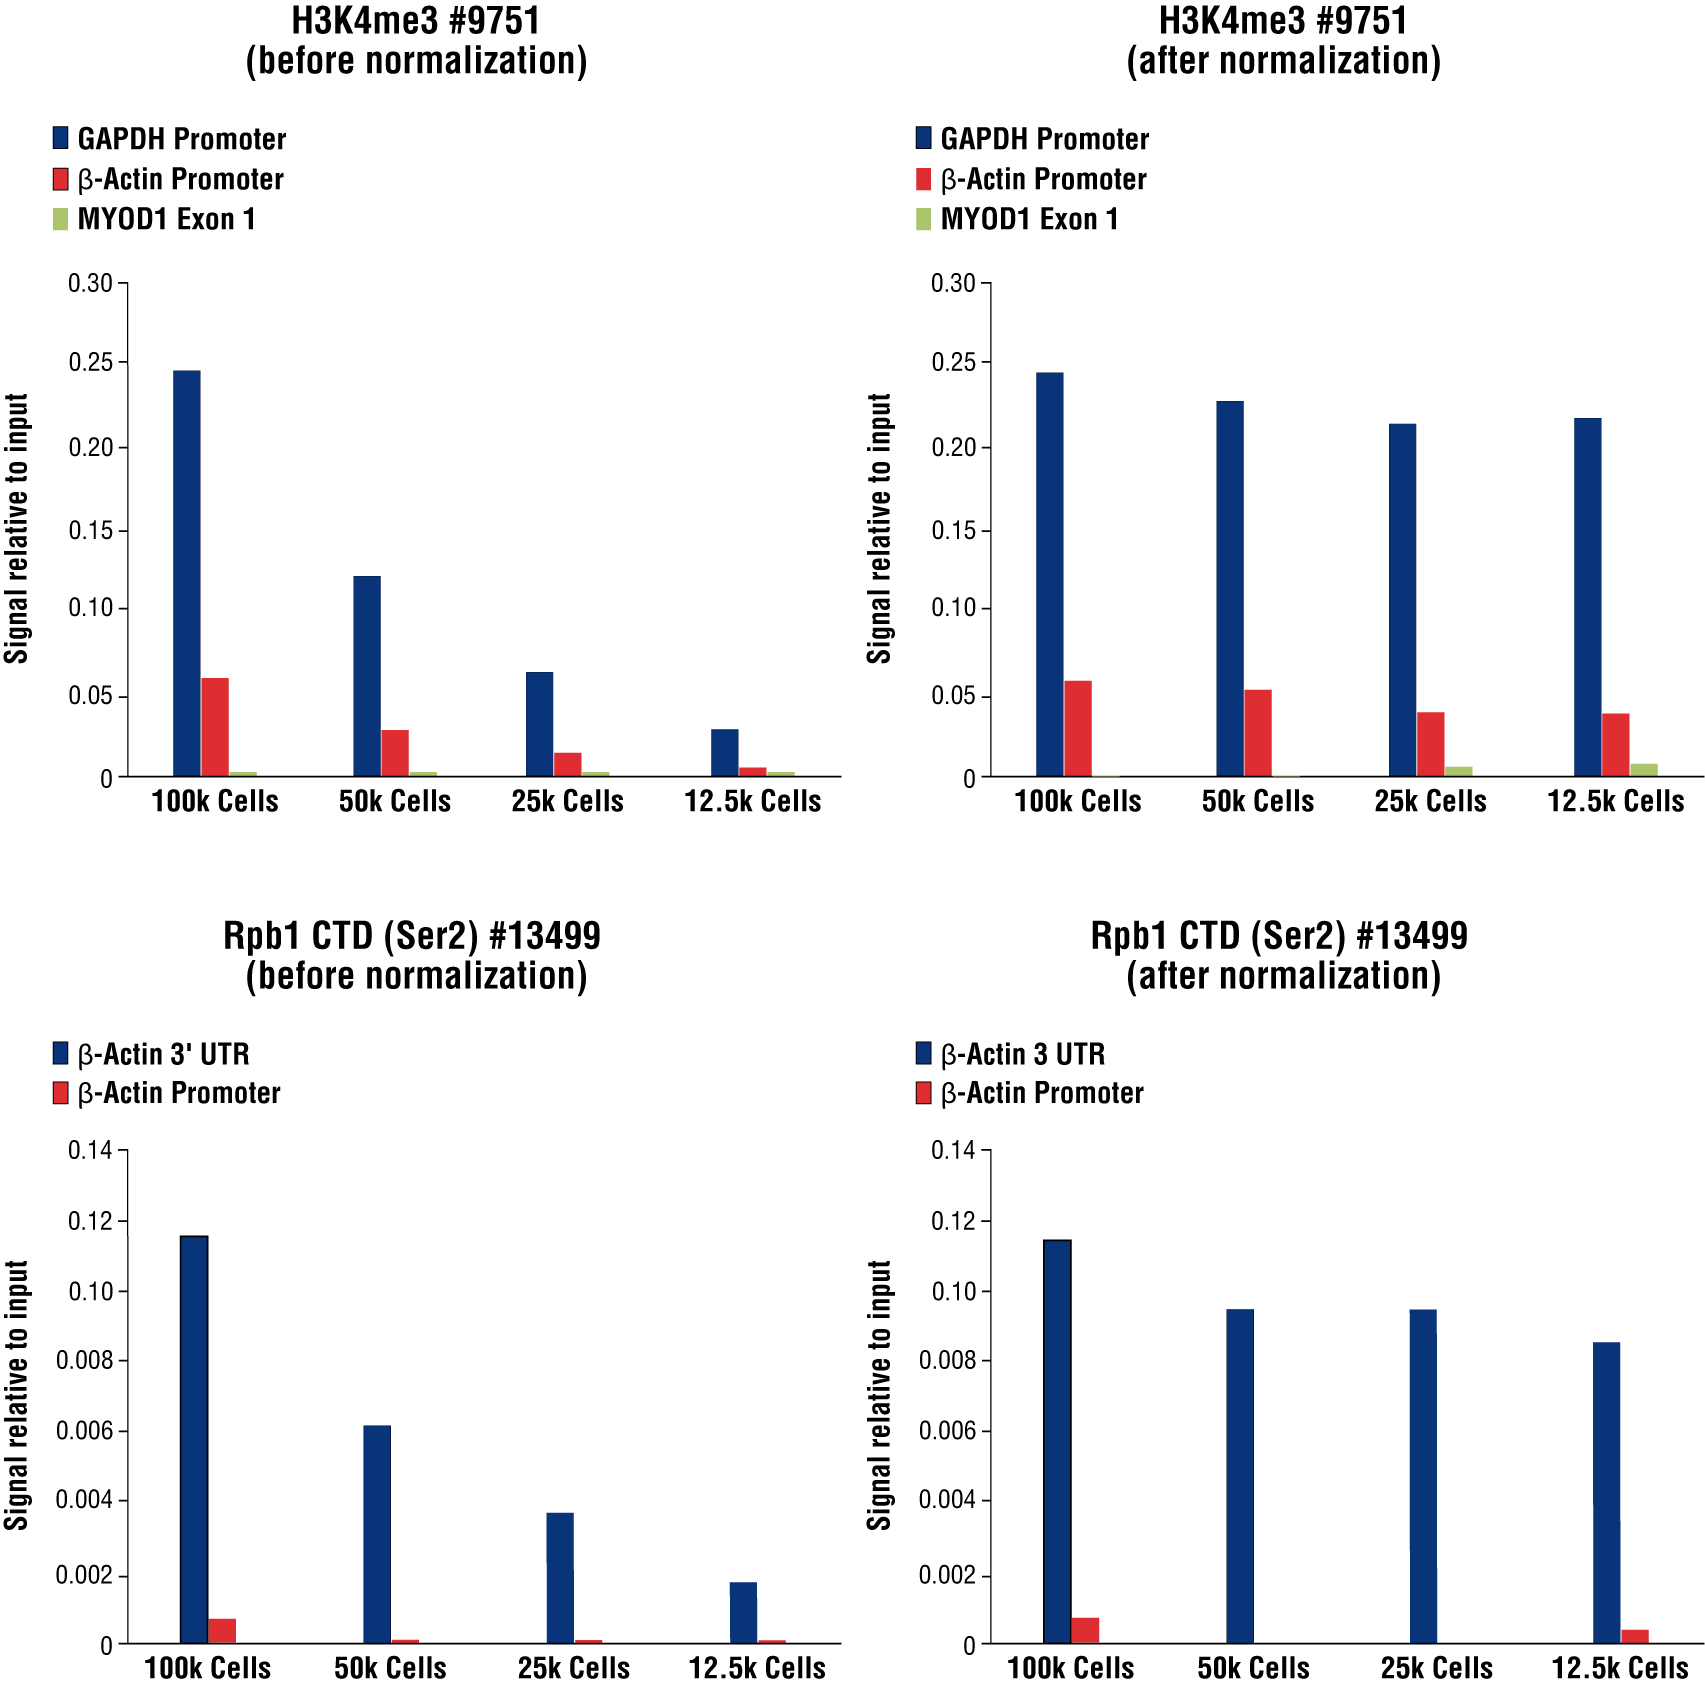
FIGURE 8. Normalization of CUT&RUN signals using spike in DNA for qPCR analysis. CUT&RUN was performed with a decreasing number of HCT116 cells and either Tri-Methyl-Histone H3 (Lys4) (C42D8) Rabbit mAb #9751 (upper panels) or Phospho-Rpb1 CTD (Ser2) (E1Z3G) Rabbit mAb #13499 (lower panels). Enriched DNA was quantified by real-time PCR using SimpleChIP® Human GAPDH Exon 1 Primers #5516, SimpleChIP® Human β-Actin Promoter Primers #13653, SimpleChIP® Human β-Actin 3' UTR Primers #13669, and SimpleChIP® Human MyoD1 Exon 1 Primers #4490. The amount of immunoprecipitated DNA in each sample is represented as signal relative to the total amount of input chromatin for 100,000 cells. Non-normalized enrichments are depicted in the left panels. The Sample Normalization Spike-In DNA was added into each reaction proportionally to the starting cell number. Based on the difference of qPCR signals from spike in DNA in each sample, CUT&RUN signals were normalized to the sample containing 100,000 cells. Normalized enrichments are depicted in the right panels.
The immuno-enriched DNA samples prepared with this kit are directly compatible with NG-seq. For downstream NG-seq DNA library construction, use a DNA library preparation protocol or kit compatible with your downstream sequencing platform. For sequencing on Illumina® platforms, we recommend using DNA Library Prep Kit for Illumina® (ChIP-seq, CUT&RUN) #56795 with Multiplex Oligos for Illumina® (ChIP-seq, CUT&RUN) #29580 or #47538, following the Protocol for CUT&RUN DNA.
| The Number of Unique Reads Aligned to Yeast | Normalization Factor for NGS | The Number of Unique Reads Aligned to Test Reference Genome Before Normalization | The Number of Unique Reads Aligned to Test Reference Genome After Normalization | |
| Sample 1 | 219,275 | 219,275/219,275 = 1.00 | 5,077,747 | 5,077,747 X 1.00 = 5,077,747 |
| Sample 2 | 411,915 | 219,275/411,915 = 0.53 | 9,896,671 | 9,896,671 X 0.53 = 5,268,306 |
| Sample 3 | 816,235 | 219,275/816,235 = 0.27 | 17,842,773 | 17,842,773 X 0.27 = 4,793,320 |
| Sample 4 | 1,120,826 | 219,275/1,120,826 = 0.20 | 23,836,679 | 23,836,679 X 0.20 = 4,663,339 |
Normalization Factor for NGS = the number of unique yeast reads from Selected Sample / the number of unique yeast reads from the other sample
In the CUT&RUN protocol, the addition of digitonin to the buffers facilitates the permeabilization of cell membranes and entry of the primary antibody and pAG-MNase enzyme into the cells and nuclei. Therefore, having an adequate amount of digitonin in the buffers is critical to the success of antibody and enzyme binding and digestion of targeted genomic loci. Different cell lines exhibit varying sensitivities to digitonin cell permeabilization. While the amount of digitonin recommended in this protocol should be sufficient for permeabilization of most cell lines or tissues, you can test your specific cell line or tissue using this protocol. We have found that the addition of excess digitonin is not deleterious to the assay, so there is no need to perform a concentration curve. Rather, a quick test to determine if the recommended amount of digitonin works for your cell line is sufficient.
NOTE: Digitonin Solution #16359 should be stored at -20°C. Please keep on ice during use and store at -20°C when finished for the day.
NOTE: If the cell pellet is not visible by eye, we recommend removing as much cell medium as possible without disturbing the cell pellet after the initial centrifugation of the cell suspension in Step 2 and leave behind some cell medium per reaction. Then in Step 3 add enough 1X Wash Buffer to the cell suspension to achieve a total volume of 100 µl.
Sonication of the input DNA sample is recommended because only fragmented genomic DNA (<10 kb) can be purified using DNA purification spin columns. Additionally, the fragmented genomic DNA (<1kb) may be used as the negative control in NG-seq analysis. Sonication should be optimized so that the input DNA is 100-600 bp in length.
We recommend using the input sample for NG-seq because it provides a convenient and unbiased representation of the cell genome. While the IgG sample can also be used as a negative control for NG-seq, it may show enrichment of specific regions of the genome due to non-specific binding. Unfragmented input DNA can be used for qPCR analysis. However, unfragmented DNA must be purified using phenol/chloroform extraction followed by ethanol precipitation.
! All buffer volumes should be increased proportionally based on the number of input samples being prepared.
NOTE: If the centrifuged cell pellet is not visible by eye when working with low cell numbers (<100,000 cells), we recommend skipping the wash steps 3-5 below. Remove as much cell medium as possible without disturbing the cell pellet after the initial centrifugation of the cell suspension in Step 2 and leave behind some cell medium per reaction. Then in Step 6 add enough 1X Wash Buffer to the cell suspension to achieve a volume of 100 µl per sonication condition being tested.
NOTE: Samples will be incubated at 55°C in Step 9, so it is recommended to use a safe-lock 1.5 ml tube to reduce evaporation during the incubation.
For a detailed troubleshooting guide, please go to https://cst-science.com/troubleshooting-CUT-RUN
Protocol Id: 1884
Human, Mouse
Pig
Monoclonal antibody is produced by immunizing animals with a synthetic peptide corresponding to the sequence of human PU.1 protein.
PU.1 is a member of the Ets family of transcription factors and activates target genes through the purine-rich PU-box (1). PU.1 plays a pivotal role in the differentiation of myeloid cells and lymphocytes and is expressed in several hematopoietic cells including B lymphocytes, macrophages, neutrophils, mast cells, early erythroid cells, and megakaryocytes (1,2). The concentration of PU.1 is critical for both the determination of hematopoietic cell lineage and the regulation of differentiation versus stem cell proliferation (3,4). In addition, PU.1 activity is influenced by phosphorylation and interactions with other hematopoietic transcription factors. Phosphorylation of PU.1 at Ser146 by CK2 promotes binding to IRF4 and synergistic activation through the immunoglobulin κ 3' enhancer (5). Treatment of pro-B cells with IL-3 leads to phosphorylation of PU.1 at Ser140, resulting in increased PU.1 activity and activation of the anti-apoptotic gene MCL-1 (6). GATA1 binding blocks PU.1 activity during erythroid cell development (7). Overexpression of PU.1 resulting from proviral insertion during Friend virus infection can induce erythroleukemia, while reduced expression has been associated with acute myeloid leukemia (8).
Except as otherwise expressly agreed in a writing signed by a legally authorized representative of CST, the following terms apply to Products provided by CST, its affiliates or its distributors. Any Customer's terms and conditions that are in addition to, or different from, those contained herein, unless separately accepted in writing by a legally authorized representative of CST, are rejected and are of no force or effect.
Products are labeled with For Research Use Only or a similar labeling statement and have not been approved, cleared, or licensed by the FDA or other regulatory foreign or domestic entity, for any purpose. Customer shall not use any Product for any diagnostic or therapeutic purpose, or otherwise in any manner that conflicts with its labeling statement. Products sold or licensed by CST are provided for Customer as the end-user and solely for research and development uses. Any use of Product for diagnostic, prophylactic or therapeutic purposes, or any purchase of Product for resale (alone or as a component) or other commercial purpose, requires a separate license from CST. Customer shall (a) not sell, license, loan, donate or otherwise transfer or make available any Product to any third party, whether alone or in combination with other materials, or use the Products to manufacture any commercial products, (b) not copy, modify, reverse engineer, decompile, disassemble or otherwise attempt to discover the underlying structure or technology of the Products, or use the Products for the purpose of developing any products or services that would compete with CST products or services, (c) not alter or remove from the Products any trademarks, trade names, logos, patent or copyright notices or markings, (d) use the Products solely in accordance with CST Product Terms of Sale and any applicable documentation, and (e) comply with any license, terms of service or similar agreement with respect to any third party products or services used by Customer in connection with the Products.