
Immunohistochemistry (IHC)
Overview of Immunohistochemistry (IHC)
Immunohistochemistry (or IHC) is an antibody-based technique used to characterize protein expression in tissue whose structure and organization has been preserved. The first reported use of IHC was in 1942 by Coons et al., who reported the development of a fluorescently-linked antibody to visualize pneumococcal bacteria. It is widely used both in medical research labs and in clinical settings to investigate the presence of an antigen in biological samples. The technique relies on the specific recognition of an epitope by an antibody. Commonly, this particular binding partnership requires some optimization to achieve accurate results. Several aspects of the tissue processing pipeline can impact how antibodies interact with the tissue and should be carefully adjusted to allow for proper binding of antibodies to their specific target proteins.
IHC Protocol Video for Paraffin-embedded Tissue Sections
What is Immunohistochemistry?
IHC exploits the relationship between an antibody and an antigen to visualize protein expression in situ. What makes this method unique is that it incorporates the preservation of anatomical and structural features of a tissue sample. This allows for high-resolution visualization of proteins and how they localize within cells and various sub-cellular compartments. In short, IHC combines immuno-detection with advanced microscopy in a way that is relatively streamlined and straightforward, yet extremely versatile.
When is immunohistochemistry used?
IHC is used in clinical settings to identify various pathogenic features—such as neoplasia, metastasis, infection, and inflammation—within tissue samples for diagnostic purposes. Additionally, IHC is often used in biomedical research to detect proteins of interest in various contexts, as well as in drug development.
Immunohistochemical analysis of paraffin-embedded human lung carcinoma with high (left) and low levels (right) of ALK expression using ALK (D5F3®) XP® Rabbit mAb #3633.
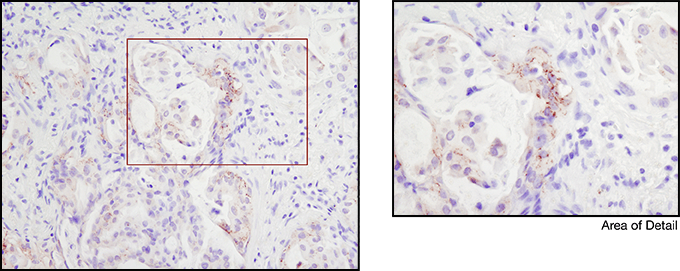
Immunohistochemical analysis of paraffin-embedded human lung carcinoma using ROS1 (D4D6) Rabbit mAb #3287. Note: Staining is of FIG-ROS1 fusion (Rimkunas, V.M. et al. (2012) Clin Cancer Res 18, 4449-4457.)
How does immunohistochemistry work?
As mentioned above, on its most basic level, IHC is dependent upon antibody detection of specific proteins of interest in a tissue sample. But, of course, nothing is that simple. First, let’s go through a general outline of the important steps that are needed for an IHC experiment to be successful, then we’ll go through each step in more detail.
11 Step Protocol for Successful IHC
Here we give an overview of our recommended protocol and discuss which steps we believe are key to a successful experiment. We provide recommendations on reagents and procedures based upon our extensive experience with IHC as part of our antibody validation and technical support processes. IHC is a challenging application and problems often occur. This guide aims to help you improve your IHC analysis by providing suggestions to allow you to achieve the expected results with minimal end-user optimization.
Please Note: The following steps reflect the protocol for paraffin-embedded samples.
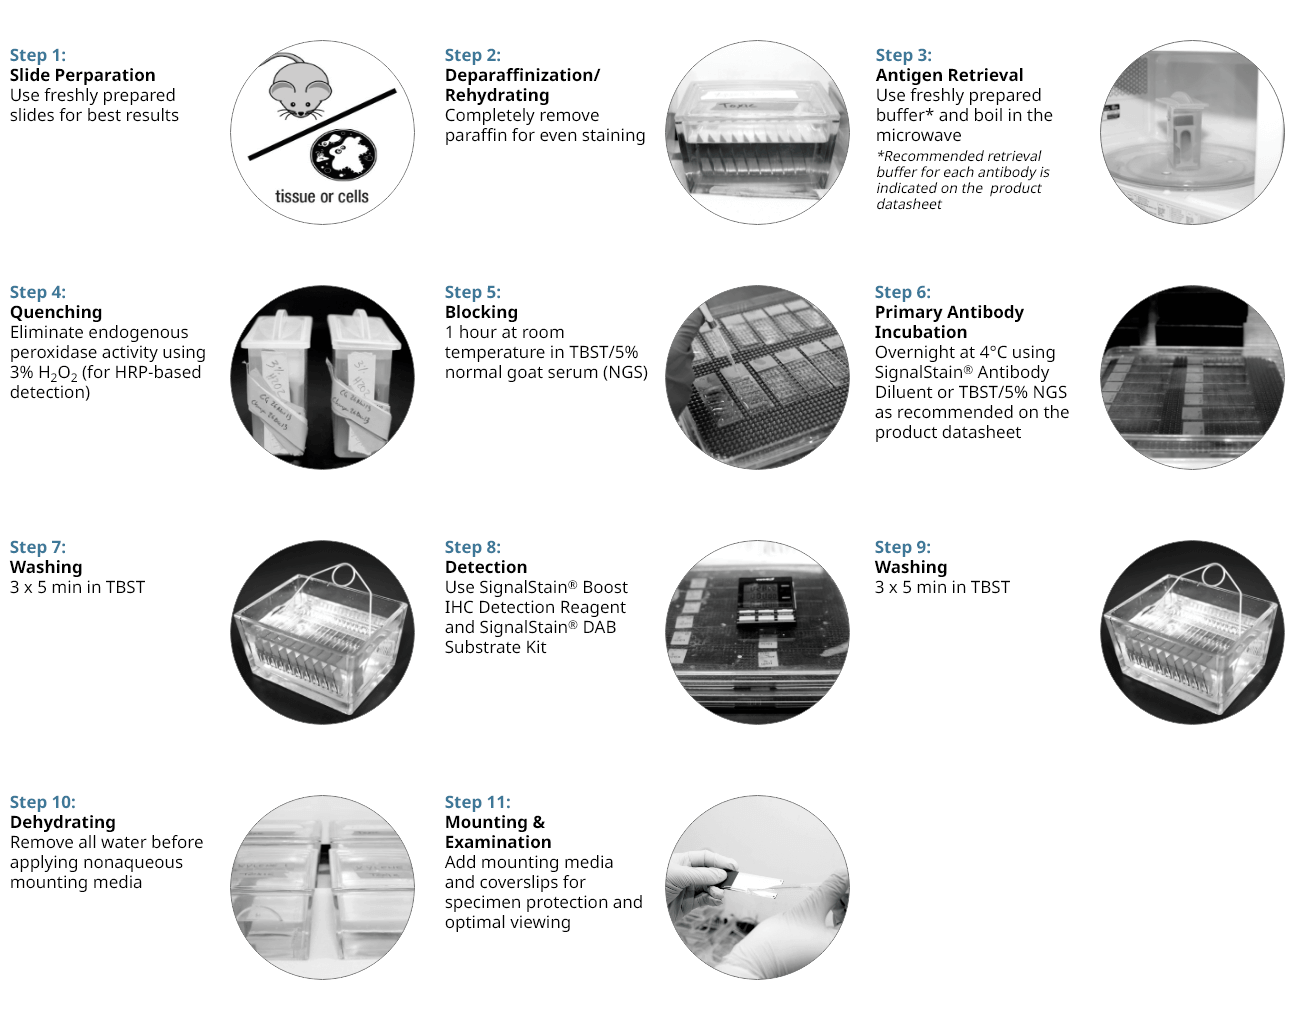
11 Step Protocol for Successful IHC
Fixation
A key feature of IHC is the preservation of tissue using one of the many available fixatives in order to maintain the native structure of the cells that make up that tissue. So the first, often overlooked, but very critical step of any IHC procedure, is fixation. Different chemicals can be used to lock the proteins of the cells and tissue into a rigid structure, creating a fixed skeleton of the previously alive cells. Chemical fixation is the most popular option but since other options exist, this initial step of should be considered carefully and the best fixation method should be determined based on how the rest of the IHC will be performed.
Embedding
After fixation, the tissue needs to be stabilized in a block so that it can be cut into thin sections for staining. Depending on the fixation method chosen, the type of block may vary from paraffin-based (for cutting using a microtome), to temperature-sensitive and water-soluble (for cutting with a cryostat), or agar (for cutting on a vibratome).
Tissue Sectioning
Once the tissue is stabilized for cutting, different instruments may be used to generate sections of various thicknesses, depending on the desired IHC application. Despite many differences, one thing is common to all these sectioning instruments: the use of a very sharp blade to slice through tissue without leaving behind any damage. The type of blade chosen should match the instrument being used and the tissue being cut; and it should be thoroughly cleaned between applications to maintain its sharpness. When the tissue section is cut, it is mounted to the slide and allowed to air dry before the next steps.
Antigen Retrieval
Several methods exist for revealing epitopes that have been masked by fixation. These include proteolytic-induced antigen retrieval, which relies on an enzyme like proteinase K, or heat-induced epitope retrieval (HIER), which uses heat to break apart cross-linked bonds and unwind proteins. Either method can unmask epitopes, rendering them accessible to the primary antibody and amenable to staining by IHC.
At CST, our most common antigen retrieval method is HIER, so this is the method we will discuss in detail. HIER involves heating and then cooling the tissue sections while they are immersed in a solution with a defined buffering capacity. The pH of the buffer helps keep the proteins unwound after the temperature has returned to normal, so the pH range of the system should be optimized to the antibody-epitope interaction of interest. The slightly acidic buffer citrate (pH 6.0) is effective at unmasking a wide range of epitopes, but some epitopes may require a more basic buffer, like EDTA (pH 8.0).
Immunostaining
Immunostaining principles are very similar to those of a western blot but instead of purifying and immobilizing proteins onto a membrane, they are immobilized where they naturally cluster within the cell (i.e. in situ). The immunostaining process can be broken down into four major parts: 1) blocking and permeabilization (where required), 2) primary antibody addition, 3) secondary antibody selection and addition, and 4) detection. Together, these four parts of an immunostaining protocol work in concert to create the ideal conditions for a highly specific binding of the primary antibody to a single protein, and proper visualization of this protein. Therefore, several important considerations (as shown below) should be taken into account when preparing and applying reagents, and you should be prepared for some optimization and troubleshooting in order to maximize signal and minimize unwanted background noise. Keep in mind that along with the fixation and tissue preparation, the immunostaining procedure will be largely determined by the desired readout since IHC allows for two broad classes of detection: 1) chromogenic, and 2) fluorescent. Lastly, distinct classes of primary antibodies can be used for direct versus indirect labeling of the protein, and the decision to utilize either type of antibody is determined by antigen expression level and its accessibility.
Additional staining of various cellular compartments or macromolecules can be done after all immunostaining is completed. This is known as counterstaining. Counterstaining labels sub-cellular organelles as well as structural elements of the cell and can be useful in contextualizing the protein of interest.
Mounting & Visualization
After all staining is completed, the tissue is now almost ready for visualization with a microscope. In order to do so, the tissue needs to be mounted onto a microscope slide using a mounting media and coverslip. The mounting media can be aqueous or permanent, and is typically added to preserve the staining and to create the ideal refractive index for the type of microscope that will be used for visualization. This is the final step to seal the slides using a coverslip to protect the tissue and in some cases, preserve the slide for future imaging.
How to prepare a tissue?
In order to achieve the best readout, proper sample preparation is of utmost importance. Collection and fixation of the tissue will directly impact sample integrity and macromolecular accessibility within the tissue, in turn affecting the antigenicity of target proteins. So, choice of tissue collection method, fixation reagents, and sectioning all depend on the desired endpoint.
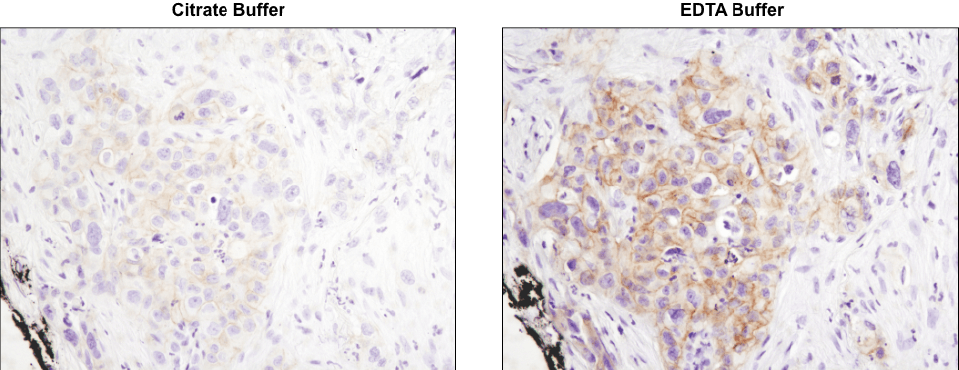
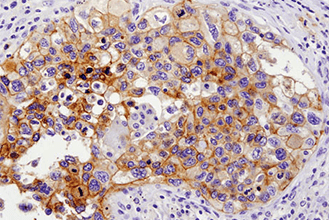
Using the CST-recommended retrieval buffer can enhance your final staining results. IHC analysis of paraffin-embedded human lung carcinoma using Phospho-HER3/ErbB3 (Tyr1289) (D1B5) Rabbit mAb #2842 after antigen retrieval using a citrate buffer (left) or EDTA buffer (right). As shown, using EDTA buffer with #2842 results in a more robust signal with increased staining observed at the cell membrane. Always check the product datasheet for the appropriate retrieval buffer for the antibody you are using.
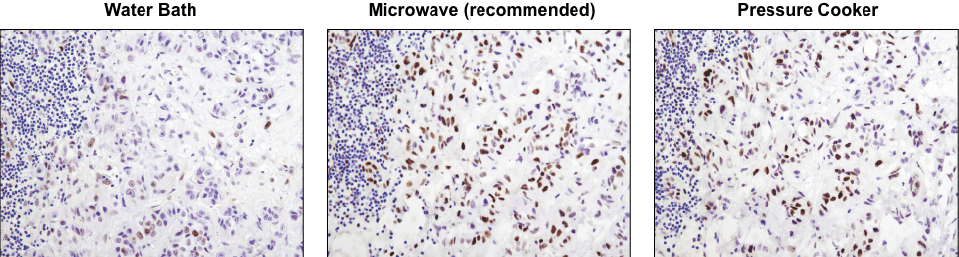
A microwave oven is recommended for antigen retrieval. IHC analysis of paraffin-embedded human lung carcinoma using Phospho-Stat3 (Tyr705) (D3A7) XP® Rabbit mAb #9145 after antigen retrieval using a water bath (left), microwave oven (center), or pressure cooker (right). A clear difference in performance is seen when using a microwave as compared with a water bath. For some antibodies, using a pressure cooker may enhance signals beyond those obtained with a microwave.
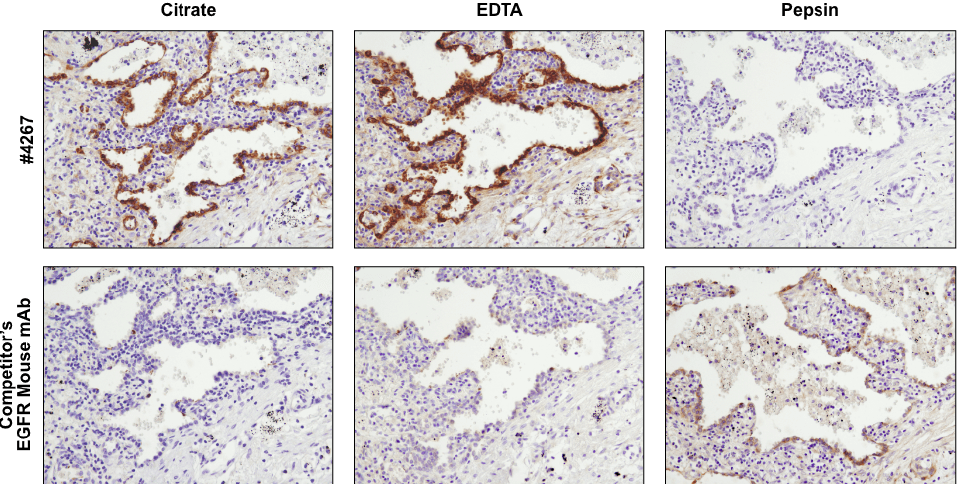
Antibodies targeting the same protein may have different preferred methods of antigen retrieval. IHC analysis of paraffin-embedded human lung carcinoma using EGF Receptor (D38B1) XP® Rabbit mAb #4267 and an EGFR mouse mAb after antigen retrieval by boiling in citrate buffer (left), boiling in EDTA buffer (center), or digestion with pepsin (right). For #4267, superior signal is obtained with EDTA retrieval. However, for the competitor’s EGFR mouse mAb, signal is only achieved with pepsin digestion.
Tissue Collection
Fixation
Cross-linking fixatives are the most commonly used in histological sample preparations and are typically aldehyde-based. These include formaldehyde, paraformaldehyde, and glutaraldehyde. Other types of chemical fixatives, such as oxidizing agents and alcohol-based fixatives, are available if aldehyde fixation is not suitable for antigen detection or the desired readout. For example, as a general rule, tissue intended for visualization by an electron microscope should be more strongly fixed than tissue generated for lower-resolution microscopes. Additionally, for certain applications, physical fixation methods, such as those achieved through heat or freeze-drying may be more appropriate.
Tissue Embedding & Processing
Tissue samples fixed in formaldehyde/formalin are often embedded in paraffin, which is a wax- based embedding medium. This type of tissue is commonly referred to as FFPE (formalin-fixed paraffin-embedded) tissue. FFPE tissue is often cut with a microtome into thin sections, which are mounted on coated slides. While this type of fixation and embedding is most common and allows for long-term tissue storage and superb maintenance of cell structure, several steps are needed after cutting and prior to immunostaining to uncover target proteins and allow access for antibodies to bind. These steps include oven, air or microwave drying, de-paraffinization with organic solvents, and antigen-retrieval—all prior to immunostaining. In particular, antigen retrieval can be essential for unmasking the antigens and can be achieved by boiling the samples in various buffers with varying pH values or by digesting the tissue with proteolytic enzymes.
If the tissue or the antigen is incompatible with formalin-fixation, then samples can be fixed with paraformaldehyde (PFA) or embedded into temperature-sensitive cryogenic material and snap-frozen with liquid nitrogen. In both cases, frozen tissue can be cut using a cooled microtome, or cryostat, into thin sections that are mounted on slides. Generation and use of this tissue is much easier than FFPE tissue, but the morphology is not as nicely preserved. Keep in mind that frozen tissue also requires removal of water molecules through osmosis prior to freezing, in order to decrease freezing artifacts. Non-fixed tissue will typically undergo a post-fixation step once the sections are on slides. Once sections cut by a cryostat are placed on slides, they may require some minimal drying time. Similar to FFPE tissue, cryosectioned tissue may also require an antigen retrieval step depending on the accessibility of the antigen of interest.
Alternatively, fixed tissue can be cut directly using a vibrating microtome, or vibratome, without being embedded per se. Tissue can be reversibly encased in agar to stabilize it just enough for cutting with a vibratome. The resulting free-floating sections can be stored in a physiological buffered solution and stained in wells. These sections tend to be much thicker, so antibody penetration may not be maximally achieved. However, tissue integrity is well-maintained and reagent use is minimized. Free-floating sections require mounting after immunostaining. In this case, no drying of tissue slices is needed.
How to do Immunostaining
Immunostaining is a general term referring to any method using an antibody to detect a specific protein in a cell or tissue sample. When planning your immunostaining experiment, several aspects will depend on the specific type of immunostaining protocol you are performing. The following resources can help design and perform optimal IHC experiments in FFPE tissue.
Immunohistochemistry Tips and Techniques
Better IHC Intro and Step 1: Antigen Retrieval
Better IHC Step 2: Antibody Dilution
Better IHC Step 3: Detection
Better IHC Step 4: Chromogen
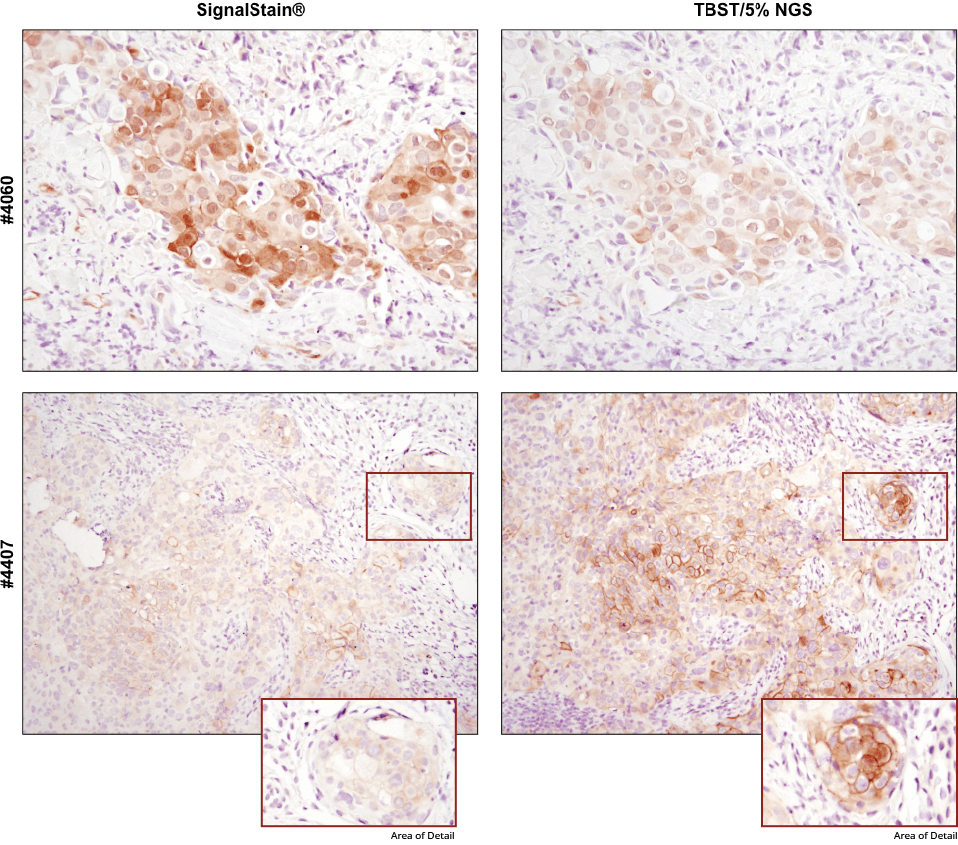
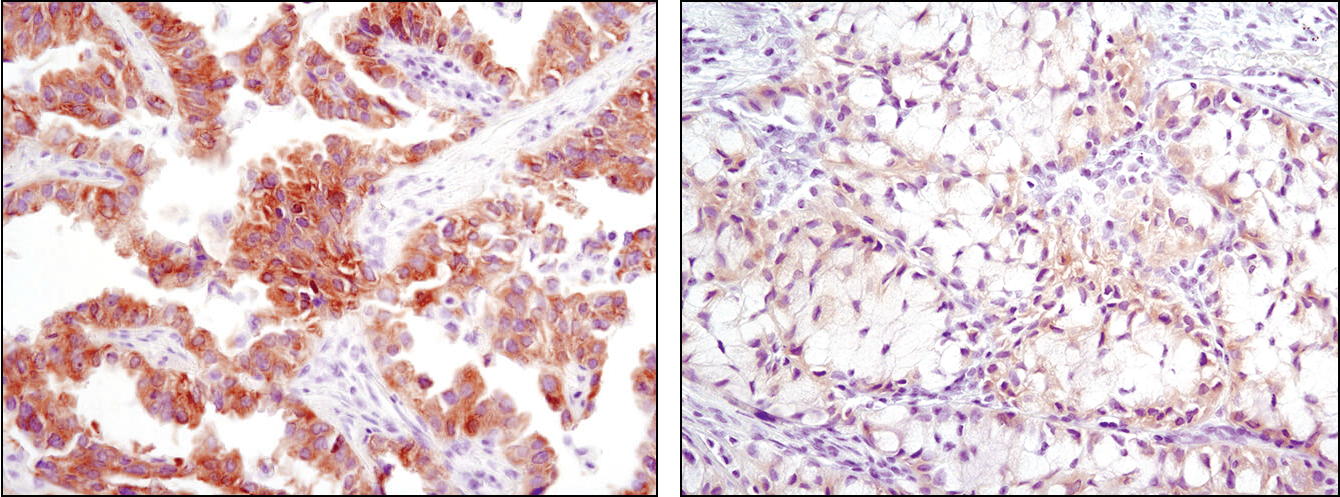
For optimal results, always use the recommended primary antibody diluent, as indicated on the product datasheet. IHC analysis of paraffin-embedded human breast carcinoma (top) and HCC827 xenograft (bottom) using Phospho-Akt (Ser473) (D9E) XP® Rabbit mAb #4060 or Phospho-EGF Receptor (Tyr1173) (53A5) Rabbit mAb #4407 after dilution in either SignalStain® Antibody Diluent (left) or TBST/5% NGS (right). As shown, a superior signal is achieved when #4060 is diluted in SignalStain® Antibody Diluent as compared with TBST/5% NGS. In contrast, #4407 performs better when diluted in TBST/5% NGS. Always check the product datasheet for the recommended diluent for your specific antibody.
How to choose a good antibody for IHC
Not all antibodies will work for immunohistochemistry. Just because an antibody demonstrates a strong, specific band by western blot does not mean that it will be specific or even functional in a IHC-based assay. This is due to the differences in antigen presentation. First, look to see how the supplier has validated the antibody internally for IHC. They should show convincing data ideally in a high-, medium- and low-expressing cell line or tissue as described by Rimm et al. In addition, multiple experimental models should be used to verify the antibody performance, from cell pellets to tissue microarrays to determine specificity and functionality in a broad range of samples. Furthermore, antibody performance by IHC is highly dependent on the protocols and reagents used during the permeabilization, antigen retrieval and detection process. These should be clearly documented by the supplier. It is also helpful to look at publications that support the use of the antibody in IHC. The number of citations is usually less important than the quality of the publications, the description of the methods and dilutions used. If no supporting published material can be found, it is often best to replicate the methods used to verify the performance of the antibody by the vendor at first before adapting the methods to fit your own needs. Remember that all antibodies should be validated in the application you are using prior to initiating your experiments.
Considerations about host species
After homing in on a well-validated antibody, several other pieces of information will help determine whether this antibody is right for you. One important factor is the host species in which the antibody was produced. The host species of the primary antibody will dictate which secondary antibody to use. This is because the secondary antibody must be designed in a way that it recognizes the host species of the primary antibody. This means that, ideally, the host species of the primary antibody should differ from the species of your cell or tissue sample because if the two are the same species, it is very likely that your secondary antibody will bind to endogenous IgG within the section!
How does species reactivity affect antibody selection?
Primary antibodies are made to recognize a species-specific sequence of amino acids, or epitope, within the target protein (i.e. a mouse protein versus a human protein). Therefore, your antibody will work best if used against a protein containing that exact sequence of amino acids. For example, if the tissue sample is of human origin, it is best to ensure that it has been demonstrated that your primary antibody of interest is reactive with human samples. Sometimes epitopes are conserved across species and sometimes they vary greatly—so choose wisely!
How does isotype affect secondary antibody selection?
At this point, you’re almost ready to make the final selection of your primary and secondary antibody combination. Don’t forget that the specific isotype of your primary antibody, whether its monoclonal or polyclonal, can vary depending on the species in which it was raised. Your secondary antibody needs to match this isotype; i.e., an IgG primary antibody isotype should be matched with an anti-IgG H&L (heavy and light chain) secondary. Several isotypes exist to allow for the multiple use of several antibodies without cross-reactivity. We’ll talk about that more in the “Multiplexing” section below.
Blocking Step
Before incubating your sample with your carefully-selected primary antibody, you need to block your sample. The point of this step is to prevent non-specific binding of your antibodies to other proteins within the tissue.
What is blocking?
Blocking relies on the use of a diluted solution of various proteins to effectively coat your sample with excess protein that can attract any unbound primary or secondary antibody in the solution and prevent non-specific binding of the antibodies to the tissue section. Although blocking is a relatively simple step, be aware that some proteins are more suitable than others at providing proper blocking based on application. Importantly, a protein solution should not accidentally bind to the epitope of the target protein or it will reduce its detectability. Bovine serum albumin, or BSA, and sera from various animals are very commonly used for blocking. When using sera as a blocking reagent, be sure to match the source animal with the host species of the secondary antibody. This will minimize an off-target binding of the secondary antibody to random proteins within the tissue.
Why do a blocking step?
Because you have to! But really, blocking will only help to limit any non-specific binding of your primary and secondary antibodies to your sample. And remember specific binding is what you need for a successful immunostain, so doing this step the right way can go a long way for an optimal staining result!
Detection Method
Once the immuno-labeling of the target protein is completed, visualization of the signal is possible. Various detection methods exist to visualize the immuno-labelled protein and choice of method depends on the type of antibodies utilized during the immunostaining steps. These methods comprise two main groups: 1) chromogenic detection, and 2) fluorescent detection. The desired detection method should be determined prior to starting an IHC experiment in order to select the appropriate primary and, more importantly, secondary antibody.
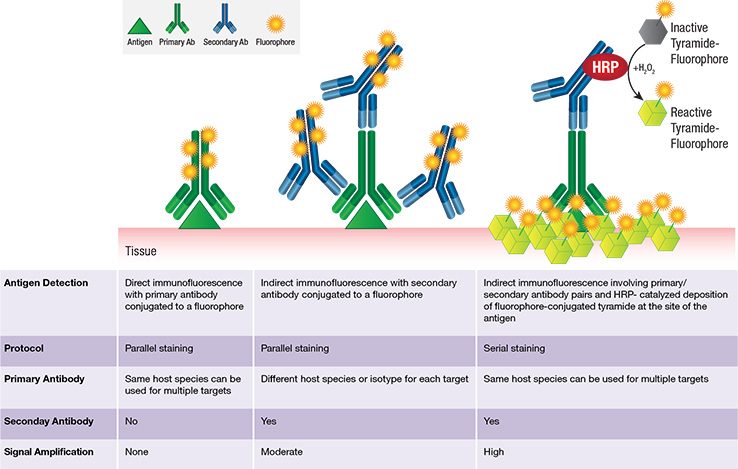
Chromogenic detection methods offer several advantages: 1) greater sensitivity (signal amplification is greater), and 2) longer lasting signal. Alternatively, fluorescent-based detection methods also have several advantages: 1) easier and higher-ordered multiplexing (because there are a range of available fluorophores with different fluorescent spectra), 2) a higher dynamic range, 3) visualization of co-localized proteins, and 4) more straightforward and time-effective protocol since no chemical substrate is needed. IHC methods can be direct or indirect, where the signal-producing moiety is either conjugated to the primary (direct) or secondary (indirect) antibody.
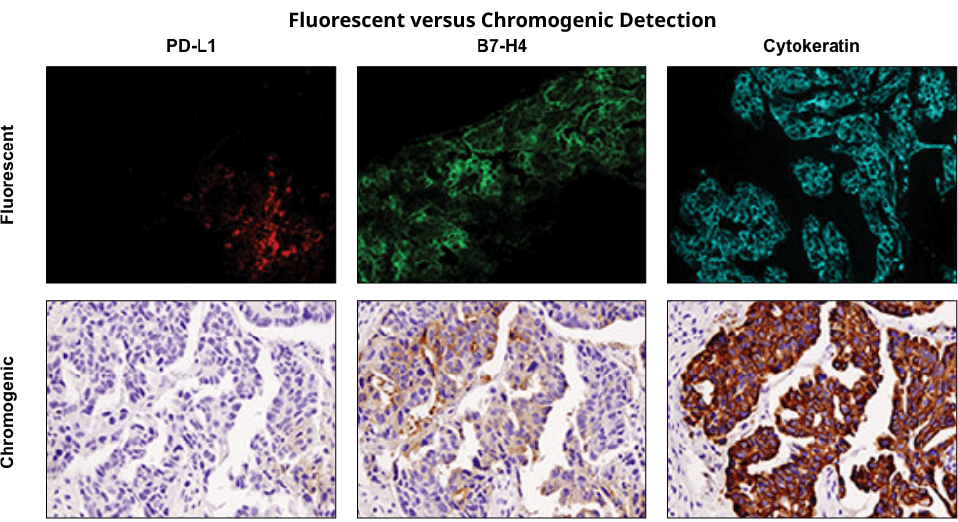
Immunohistochemical staining was performed on serial sections of ovarian carcinoma using PD-L1 (E1L3N®) XP® Rabbit mAb #13684 (left), B7-H4 (D1M8I) XP® Rabbit mAb #14572 (middle), and Pan Keratin (C11) Mouse mAb #4545 to evaluate the pattern and level of expression of these two immune checkpoint proteins using fluorescent and chromogenic detection systems. Note: the images taken were of different fields of view.
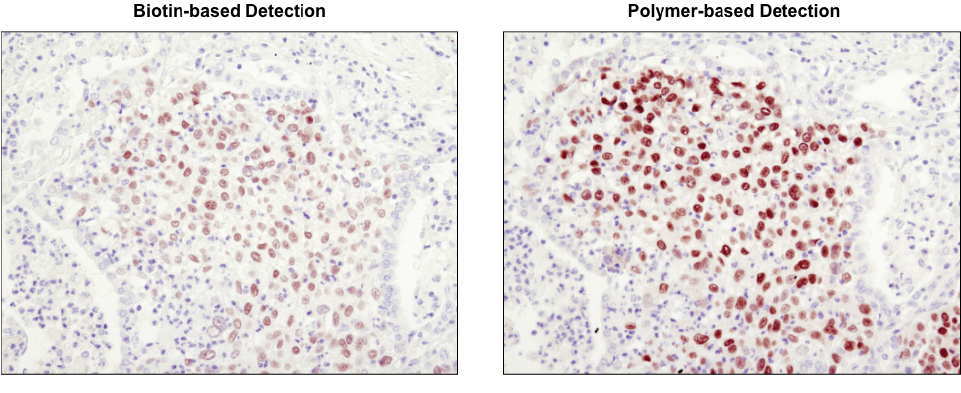
Polymer-based detection is more sensitive than biotin-based systems. IHC analysis of paraffin-embedded human lung carcinoma using Sox2 (D6D9) XP® Rabbit mAb #3579 and either biotin-based detection (left) or polymer-based detection (SignalStain® Boost IHC Detection Reagent #8114; right). As shown, polymer-based detection offers enhanced sensitivity and results in more robust staining.
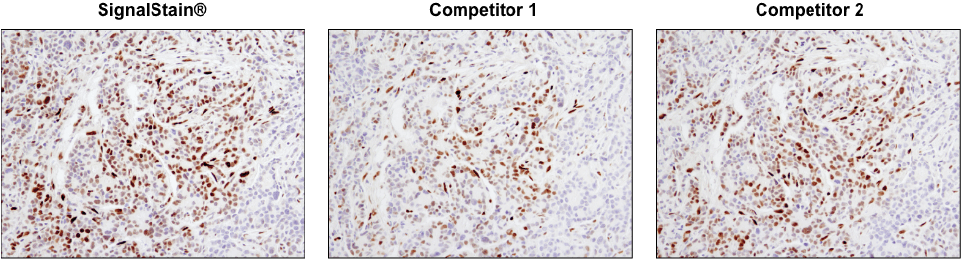
Not all DAB substrate performs equally. IHC analysis of paraffin-embedded human breast carcinoma using Phospho-Stat3 (Tyr705) (D3A7) XP® Rabbit mAb #9145. Chromogenic detection was performed using SignalStain® DAB Substrate Kit #8059 (left), DAB supplied by competitor 1 (center), or DAB supplied by competitor 2 (right). Although competitor 2 DAB produces a signal comparable to the SignalStain® DAB Substrate Kit, competitor 1 DAB results in a much weaker signal.
Counterstaining can be used in addition to the immuno-labelling of desired proteins in order to visualize specific cell structures. Commonly these stains target the cell body, nucleus, and other sub-cellular organelles. The combinatorial use of protein labelling and counterstaining will allow you to localize proteins to the specific compartments of the cells, which may be useful when trying to determine whether the immunostain is accurately identifying your protein of interest or whether this protein is incorrectly localized due to a pathological process.
Commonly used counterstains:
| Counterstain | Target | Color |
|---|---|---|
| Hematoxylin | Nuclei | Blue |
| Methyl Green | Nuclei | Green |
| Nuclear Fast Red | Nuclei | Pink |
Results Examination
Finally, it is time to visualize the result of your hard work! For chromogenic-based detection, a light microscope is needed to observe the colorful label produced by the chromogenic enzyme. On the other hand, fluorescent-based detection will require the use of a fluorescent microscope to appropriately excite the fluorophore and capture the emission. For both visualization methods, it is best to first visualize a sample that has known expression of the protein of interest as well as a negative control without any signal. By doing so, appropriate settings can be established in order to visualize the protein of interest and minimize background signal. Ideally, for quantitative analyses, all samples in a single experiment should be stained and imaged using identical settings. The intensity of the chromogenic or fluorescent signal can be analyzed in image analysis software (such as ImageJ) in order to quantify the signal. Positive and negative controls, along with optimization and standardization will ensure that the obtained results are accurate.
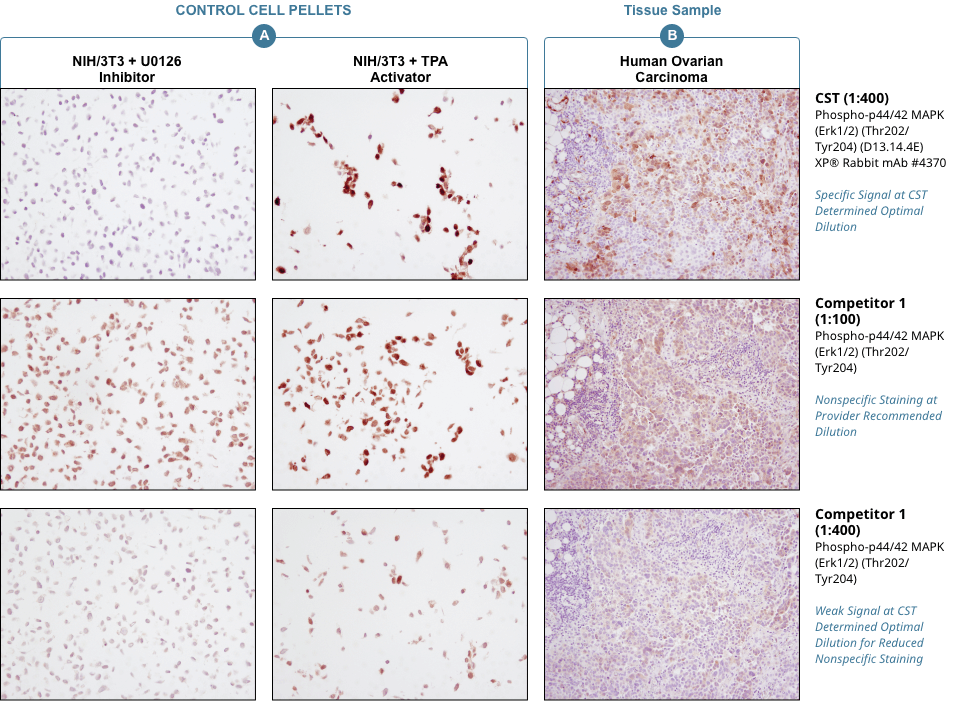
Appropriate controls are necessary to ensure specific signal. Phospho-p44/42 MAPK (Erk1/2) (Thr202/Tyr204) (D13.14.4E) XP® Rabbit mAb #4370 was compared to a competitor’s IHC-approved phospho-p44/42 (Tyr202/Tyr204) antibody. The optimal dilution of each antibody was individually evaluated to minimize nonspecific staining in NIH/3T3 cells (A) treated with the inhibitor U0126 (left) and to maximize specific signal in NIH/3T3 cells treated with the activator TPA #4174 (right). The determined optimal dilution for each antibody was utilized in IHC analysis of paraffin-embedded human ovarian carcinoma (B). Note that at the recommended dilution, the competitor’s antibody stains the inhibitor-treated cells (NIH/3T3 + U0126). At the CST determined optimal dilution, the competitor’s antibody no longer stains the inhibitor-treated cells, but also fails to stain tissue significantly. The CST antibody accurately stains both the cells and tissue.
How to look at more than one target with Multiplexing
Multiplexing allows for the visualization of multiple protein targets at once within a given sample, which is particularly advantageous with precious samples of limited quantity and in cases when protein interactions or colocalization are of interest. However; in multiplexing IHC experiments, a higher degree of optimization is necessary. The key is to select primary antibodies of different species or isotypes in order to minimize cross-reactivity of the secondary antibodies. Also, fluorescently-conjugated secondary antibodies need to have different fluorophores with non-overlapping spectra, and enzymatically-linked secondary antibodies need to have non-overlapping enzyme-substrate interactions and colors. To verify that primary and secondary antibodies bind one another as intended, several control groups should be included: no antibody controls, primary only controls, secondary only controls, and each primary with all secondaries to ensure no cross-reactivity. For more information on fluorescent multiplex methods click here
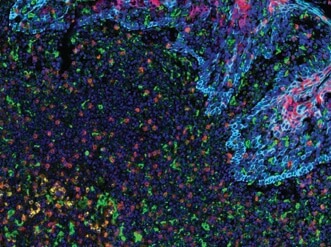
PD-L2 (orange), PD-L1 (E1L3N®) (red), CD68 (green), PD-1 (yellow), CD8α (magenta) and Pan-Keratin (cyan) on FFPE tonsil.
Multiplexing Options
Fluorescent mIHC with tyramide: overview
Conclusion
IHC is an extremely versatile technique with many applications. Like other methods, careful controls and proper optimization of the protocol will lead to the best results. From its use in diagnosis to its use in biomedical research IHC can answer many scientific questions in both low and high throughput capacity.
Additional Resources
Application Note:
Characterize Immune Checkpoint Proteins and T Cell Exhaustion Using Multiplex IHC
Application Note:
Characterize the Immunosuppressive Tumor Microenvironment using Multiplex IHC
Poster:
Highly Multiplexed IHC Assays to Examine Immune Checkpoints and Biomarkers for Immunotherapy
Poster:
Multiplex IHC Detection of Immune Checkpoint Receptors in the Tumor Microenvironment
Webinar:
Highly Multiplexed IHC Assays to Examine Immune Checkpoints and Biomarkers for Immunotherapy
Webinar:
Mulitplex IHC and Novel Monoclonal Antibodies for the Study of Tumor Immunology