- Bring glass slides and blocking buffer to room temperature before use.
- Prepare 1X Array Wash Buffer by diluting 20X Array Wash Buffer in deionized water. Dilute 1 ml of 20X Array Wash Buffer with 19 ml of deionized water. Label as 1X Array Wash Buffer. Keep at room temperature.
Prepare 1X Detection Antibody Cocktail as follows:
For running only 1 slide: Dilute 150 µl of 10X Detection Antibody Cocktail with 1350 µl of Array Diluent Buffer.
For running 2 slides: Dilute 300 µl of 10X Detection Antibody Cocktail with 2700 µl of Array Diluent Buffer. Keep on ice.
- Prepare 1X HRP-linked Streptavidin by diluting 10X HRP-linked Streptavidin in Array Diluent Buffer. Keep on ice.
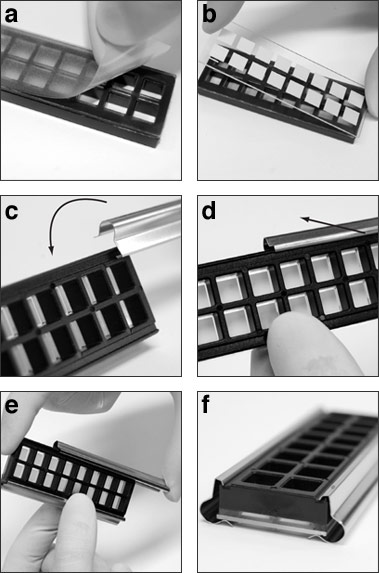
- Affix the multi-well gasket to the glass slide (see figure at bottom):
- Place the multi-well gasket facedown on the bench top (the silicone layer should be facing up). Remove the protective plastic film.
- Carefully place the glass slide on top of the multi-well gasket with the nitrocellulose pads facing down while aligning the pads with the openings in the gasket. The orientation line should appear in the upper left hand corner when the slide is oriented vertically.
Insert the metal clip into the groove in the gasket and rotate the clip into the locked position. Ensure that the clip is on the same side as the orientation line on the slide.
NOTE: one of the clips has a small dot etched onto the upper rib to assist with pad designation (see slide assembly photos).
- Slide the clip into place.
- Snap the unmarked metal clip to the other side of the assembly in the same manner and slide into place.
- The assembled array is ready to use.
Add 100 µl Array Blocking Buffer to each well and cover with sealing tape. Incubate for 15 minutes at room temperature on an orbital shaker.
NOTE: Do not allow the pads to dry out at any time during the assay.
- Decant Array Blocking Buffer by gently flicking out the liquid into a sink or other appropriate waste receptacle. Add 50 – 75 µl diluted lysate to each well and cover with sealing tape. Incubate for 2 hours at room temperature (or overnight at 4°C) on an orbital shaker.
- Decant well contents by gently flicking out the liquid into a sink or other appropriate waste receptacle. Add 100 µl 1X Array Wash Buffer to each well and incubate for 5 minutes at room temperature on an orbital shaker. Repeat three more times. Decant well contents.
- Add 75 µl 1X Detection Antibody Cocktail to each well and cover with sealing tape. Incubate for 1 hour at room temperature on an orbital shaker.
- Wash 4 – 5 minutes with 100 µl 1X Array Wash Buffer as in step 8.
- Add 75 µl 1X HRP-linked Streptavidin to each well and cover with sealing tape. Incubate for 30 minutes at room temperature on an orbital shaker.
- Wash 4 – 5 minutes with 100 µl 1X Array Wash Buffer as in step 8.
- Remove multi-well gasket by pulling the bottom of the metal clips away from the center of the slide, then peeling the slide and gasket apart.
- Place the slide face up in a plastic dish (a clean pipette tip box cover works well). Wash briefly with 10 ml 1X Array Wash Buffer.
Dilute and combine LumiGLO and Peroxide reagents immediately before use (to make 10 ml of a 1X solution, combine 9 ml deionized water with 0.5 ml of 20X LumiGLO and 0.5 ml of 20X Peroxide).
Note for Kodak Biomax film users: This dilution of LumiGLO/Peroxide may necessitate very short exposure times (2-3 seconds) for some targets. For more convenient exposure times (20‑30 seconds) add 20 ml of deionized water to the 10 ml LumiGLO/Peroxide mix to make a 3 fold more diluted chemiluminescent reagent.
- Decant Array Wash Buffer and cover slide with LumiGLO/Peroxide reagent.
- Transfer slide to sheet protector, ensuring that it is still covered by LumiGLO/Peroxide reagent (add a small amount on top of the slide).
Immediately capture an image of the slide using a digital imaging system capable of detecting chemiluminescent signals. If desired, quantify spot intensities using commercially available array image analysis software. Alternatively, chemiluminescent film may be used. Expose film for 2 – 30 seconds using even and light pressure on the top of the development cassette (do not fasten the cassette clamps) to avoid squeezing out the LumiGLO/Peroxide reagent. Develop the film using an automated film developer.
NOTE: If both slides are being used, it is not recommended to expose them simultaneously in the same development cassette. In this case, leave the second slide in the wash buffer (step 12) while proceeding with steps 13 – 18 using the first slide. After the first slide is finished, proceed with steps 13 – 18 using the second slide and freshly diluted LumiGLO/Peroxide reagent.